Overview
Match Exception Handlers review and approve their department’s invoices in BearBuy. Here are details on how Match Exception Handlers access pending invoices in BearBuy and take action.
Before obtaining the Match Exception Handler role, you must complete the webinar available through the UC Learning Center.
Match Exception Handler Role Defined
Match Exception Handlers review invoices in BearBuy and determine whether to pay the invoice or not. The invoices that you’ll review require approval before being paid because they don’t quite match the order your department placed in BearBuy. For instance, the invoice may have a higher price or include additional items not in the original purchase order.
A match exception occurs in BearBuy when an invoice exceeds a purchase order by at least 10% or $500 (whichever is lower). When an invoice requires approval, you will receive a notification email from BearBuy. Match Exception Handlers can approve or reject the invoices but cannot edit them.
It is the responsibility of a Match Exception Handler to carefully review and research all invoices under match exceptions. This helps ensure University funds are being used appropriately and that your department’s procurement activities are properly justified.
The Match Exception Handler role is important, and all invoices should be reviewed in detail and with care. The risks for not properly reviewing match exceptions include potential non-compliance with the university, state, or federal policies and regulations, increased fraud risk, difficulty in auditing appropriate rationale for approved match exceptions, lack of information for future reference, and inconsistent decision-making leading to inefficacies.
BearBuy determines who can handle an invoice in match exception based on the Procurement Dept Code entered on the order. Your department may have more than one Match Exception Handler, any of whom can approve or reject invoices under match exceptions.
Change Order Request (Purchase Order Total Increase)
When a change order request for a new PO total is approved and the PO amount is increased, any vouchers created after March 27, 2026 that are pending match exception due to the PO previously having been fully invoiced, will have the match exception step auto-approved without manual intervention as long as it does not exceed the purchase order by at least 10% or $500 (whichever is lower).
Vouchers created before March 27, 2026, that trigger a match exception due to a PO being fully invoiced must be manually cleared by a match exception handler for them to be paid.
Accessing BearBuy
- Login to your UCSF MyAccess account.
- Click on the BearBuy link to open the application.
Notifications
When an invoice requires approval, you will receive a notification email from BearBuy.
Within BearBuy, you can view your notifications by clicking on the Notifications bell icon at the top of the page. Click on an item from the list to navigate to that invoice.

Action Items & Approval Folders
To quickly access pending invoices, click the Action Items flag at the top of BearBuy.
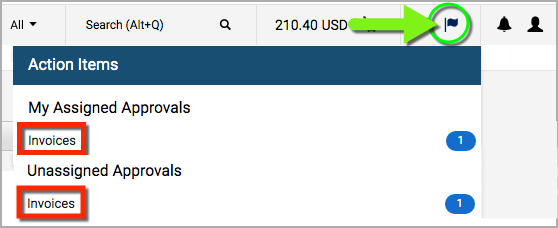
- My Assigned Approvals > Invoices lists invoices that are assigned to you and pending your approval. Clicking the link will take you to your My Voucher Approvals folder, which contains only invoices assigned to you.
- Unassigned Approvals > Invoices lists invoices for your department that are not yet assigned to an individual approver. Clicking the link will take you to your department’s shared approval folders. You can assign invoices to yourself from the shared folders to approve.
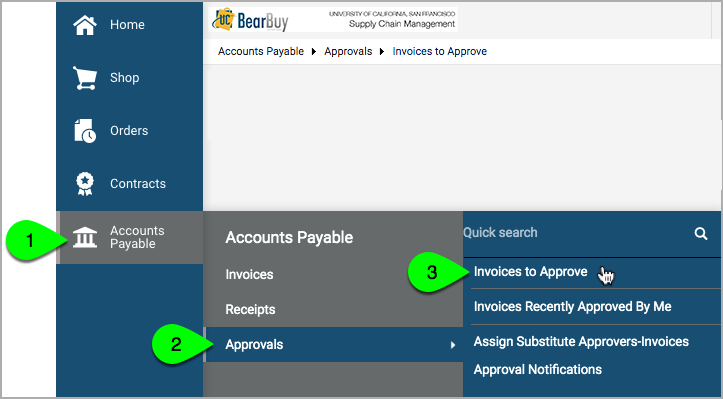
Approval folders can also be accessed from the menu on the left, go to Accounts Payable > Approvals > Invoices to Approve.
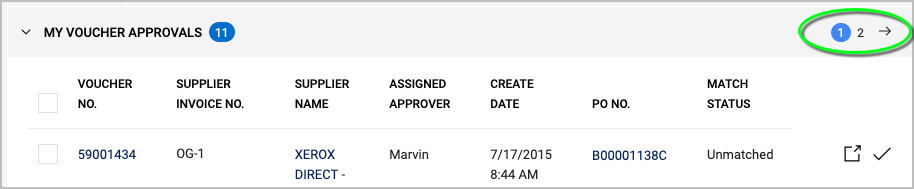
WARNING: By default, pending invoices will be organized into folders. Be aware that you may need to use the Page arrows next to the folder header to view all of the invoices in the folder.
Approve an Invoice
Note: Once you approve the invoice, it will be paid without undergoing any further review or approvals.
- Go to your Action Items or Accounts Payable > Approvals > Invoices to Approve.
- Assign the voucher to yourself by clicking the Approver icon on the right. (The voucher now appears in your My Voucher Approvals folder, indicating that it is assigned to you.)

- Click the Voucher No. to view the voucher details.

- Review the voucher and determine whether the invoice should be paid. Contact the person who placed the order and/or the supplier when necessary to determine whether the invoice should be paid.
- Select the Approve button located on the right side. (Alternatively, click the Approve & Show Next button. This will approve the invoice and then redirect you to the next voucher in your folder.)

Reject an Invoice
Rejecting permanently rejects the invoice.
- Go to your Action Items or Accounts Payable > Approvals > Invoices to Approve.
- Assign the voucher to yourself by clicking the Approver icon on the right. (The voucher now appears in your My Voucher Approvals folder, indicating that it is assigned to you.)
- Click the Voucher No. to view the voucher details.
- Review the voucher and determine whether the invoice should be paid. Contact the person who placed the order and/or the supplier when necessary to determine whether the invoice should be paid.
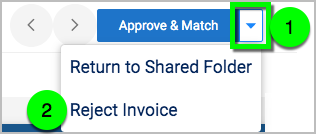
- Click the down arrow to the right of the Approve & Match button and select Reject Invoice from the dropdown menu.
- Enter an explanation for recordkeeping purposes. Then, click the Reject/Cancel button. The invoice is now rejected, and it will not be paid.
- BearBuy does NOT send notifications or comments to suppliers. Your department is responsible for contacting the supplier (by phone or email) to explain why your department is not going to pay the invoice, and ask for a corrected invoice (if needed). Please notify the supplier and/or the person who placed the order so they can help resolve any issues.
Communicate Using BearBuy Comments
Match Exception Handlers must explain the financial reasons behind the decision to approve or reject an invoice by consistently providing comments on vouchers in BearBuy.
When available, any supporting documents should be attached to a comment to support the approval or rejection of an invoice, such as an email thread between the department and supplier to justify the price difference.
Comments are internal only—they will not be sent to the supplier.
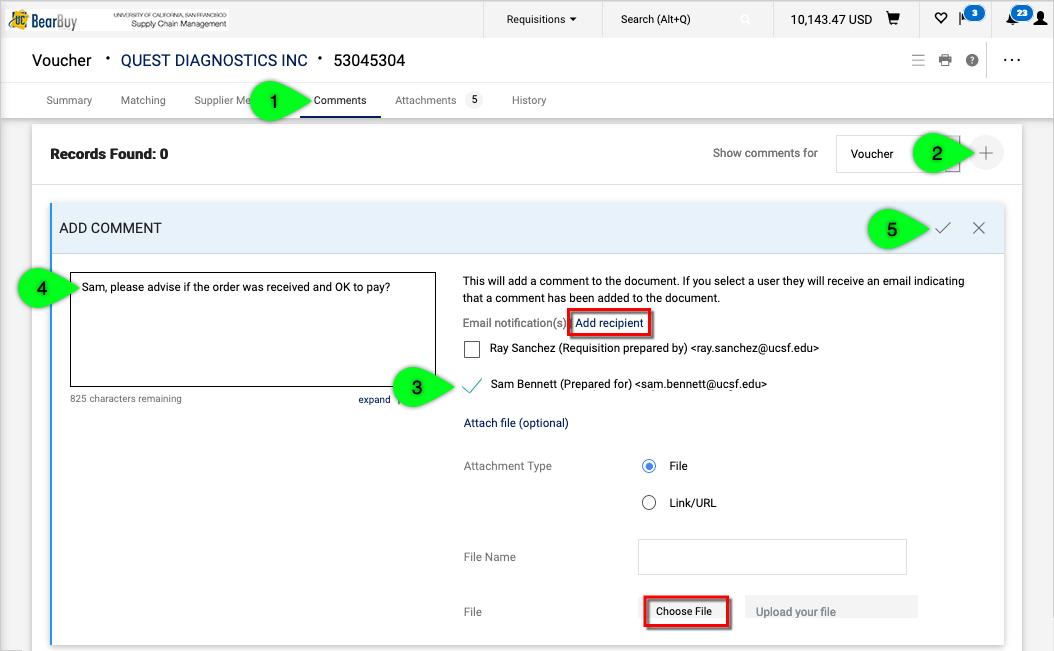
- On the voucher, click on the Comments tab at the top.
- Click the Plus sign on the right.
- Select a recipient for your comment (if desired). The "Prepared for" is the Shopper who created the original shopping cart and the person most likely to receive the order. The "Requisition prepared by" is the Requester who submitted the order. To select a different recipient, use the Add recipient link.
- Enter your comments in the text box. To upload an attachment, use the Choose File link.
- When finished, click the Checkmark.
View Recent Approvals
- Go to Accounts Payable > Approvals > Invoices Recently Approved By Me.
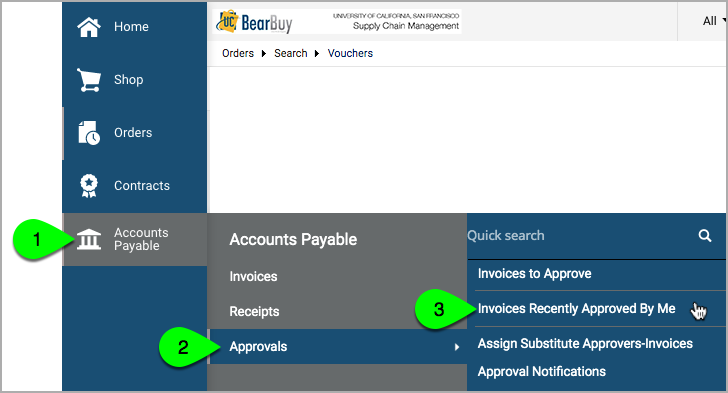
- By default, the page lists invoices you approved or rejected in the Last 30 Days. Adjust the filters as needed.
Assign a Substitute Approver
It may be necessary to set a substitute approver if you are the only Match Exception Handler for a particular Procurement Dept Code and you will be out of the office. The substitute will be able to review and approve/reject invoices on your behalf. Only individuals with the Match Exception Handler role can be selected as a substitute.
Note: The substitute can't approve vouchers that were assigned to you, even if you set a substitute for your My Voucher Approvals folder. If necessary, return the vouchers to the shared approval folder.
To set a substitute:
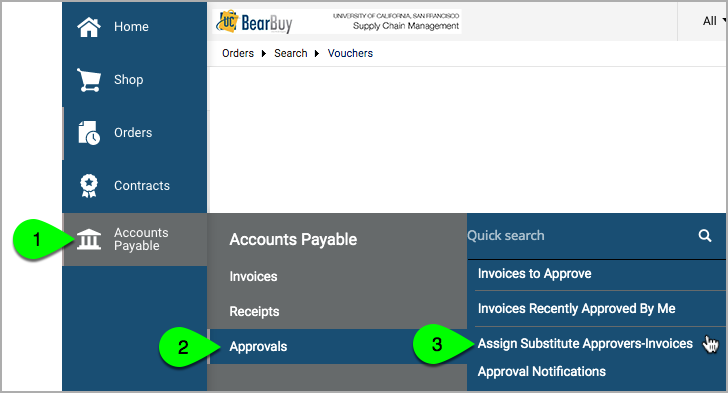
- Go to Accounts Payable > Approvals > Assign Substitute Approvers-Invoices.
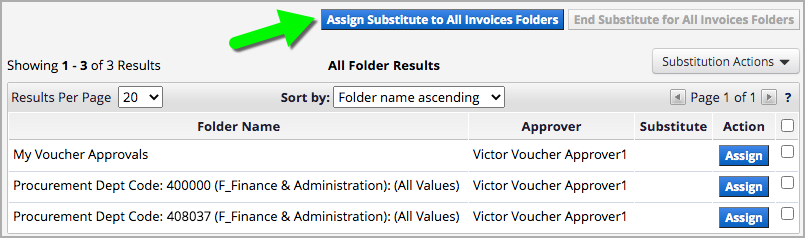
- Click the Assign Substitute to All Invoices Folders button at the top. (Alternatively, to set a substitute for only one folder, click the Assign button located to the right of the folder. To set a substitute for several folders, select the checkbox to the right of each folder, click the Substitute Actions button located above your approval folders, and then select Assign Substitute to Selected Folders.)
- In the Assign Substitute pop-up box, enter the person’s name in the Substitute Name field, and select their name.
- Then, select the checkbox to include a date range. Enter the State Date and End Date, and click the Assign button.
Note: If you do not include a date range, the substitution will start immediately, with no end. You will need to manually end the substitution when you are ready. You can manually end a substitution before the end date, or end a substitution that had no preset end date.
To end the substitution:
- Go to Accounts Payable > Approvals > Assign Substitute Approvers-Invoices.
- Click the End Substitute for All Invoices Folders button at the top. (Alternatively, to end a substitution for a specific folder, click the Remove button located to the right of the folder. To end a substitution for several folders, select the checkbox to the right of each folder, click the Substitute Actions button located above your approval folders, and then select Remove Substitute from Selected Folders.)

Frequently Asked Questions
Q: Should I approve the invoice?
A: Invoices should usually be approved for payment if the person who placed the order agreed to a higher price, they added items to the order after placing the order in BearBuy, or the supplier sent a substitute item. When necessary, ask the person who placed the order or the supplier for more information.
In general, you may need to reject the invoice if the supplier submitted a duplicate invoice or made a mistake on the invoice. If the supplier made a mistake, consider rejecting the invoice and asking the supplier to submit a corrected invoice, or pay the invoice and ask for a credit memo/refund of the difference.
Q: Why do I have more than one approval folder?
A: You may have the Match Exception Handler role for more than one Procurement Dept Code. Also, once you assign a voucher to yourself, it will appear in your My Voucher Approvals folder in addition to the shared folder. (Folders will not be displayed if there are no pending vouchers.)
Q: I received an email notification, but I don’t see the voucher in the approval folder. What happened?
A: Another approver already approved it.
Q: How do I return a voucher that is assigned to me back to the shared folder for someone else to approve?
A: Click the down arrow to the right of the Approve & Match button, and select Return to Shared Folder.
Q: I recently had to approve each new voucher on my purchase order before they are paid. Why do I have to approve each voucher?
A: When purchase orders (PO) are over-invoiced, each new voucher routes to the Match Exception Handler for approval before they can be paid. When a PO is over-invoiced and additional invoices are expected in the future, the Match Exception Handler should work with the PO Owner and the department Requester to submit a Change Order to increase the PO* amount. POs should always have sufficient balance to cover outstanding orders and invoices.
*Change Orders can only be submitted for POs created from BearBuy forms.
Gaining Role Access
To obtain access to the Match Exception Handler role, the training course available through the UC Learning Center must be completed.
Once the training is fully completed, you must notify your department's Access Administrator to be granted the Match Exception Handler role, access does not occur automatically on its own. The Access Administrator will need to submit a request in IT’s Access Management System within MyAccess to grant you the Match Exception Handler role.
If you are unsure who your department’s Access Administrator is, please contact your manager or administration team for further support.
Best Practices
- Research and approve or reject the invoice in a reasonable amount of time.
- Consult with the individual who placed an order for additional information when needed.
- Consult with a supplier directly for additional information when needed. For example, you can request the supplier itemize a consolidated amount on an invoice to identify duplicate transactions more easily.
- Review previous invoices on a purchase order in BearBuy to identify duplicate transactions.
- Review previous invoices on a purchase order in BearBuy to see if it has been over-invoiced.
- Notify the supplier by phone or email if you reject an invoice.
- Ask a supplier for a corrected invoice when needed.
- Leave comments on vouchers to justify financial decisions. Match Exception Handlers must show their due diligence of ensuring an invoice should be approved to pay by providing comments on vouchers in BearBuy with the financial justification of their decision and by attaching supplemental documentation when available. For instance, if an invoice has a higher dollar amount than originally anticipated due to a product being out of stock and an alternative option being more expensive, the Match Exception Handler must add comments on the voucher in BearBuy explaining this and attach supplemental documentation if available, such as an email thread between the department and supplier to justify the price difference.