Overview
Guidance on locating and view documents such as purchase orders, invoices and receipts in the BearBuy system.
Document Search Instructions
These instructions will help you search for requisitions, purchase orders (POs), vouchers/invoices and receipts in BearBuy.
Note: Shoppers can view only their own orders, invoices and receipts. Requesters and Approvers can view all documents in the BearBuy system.
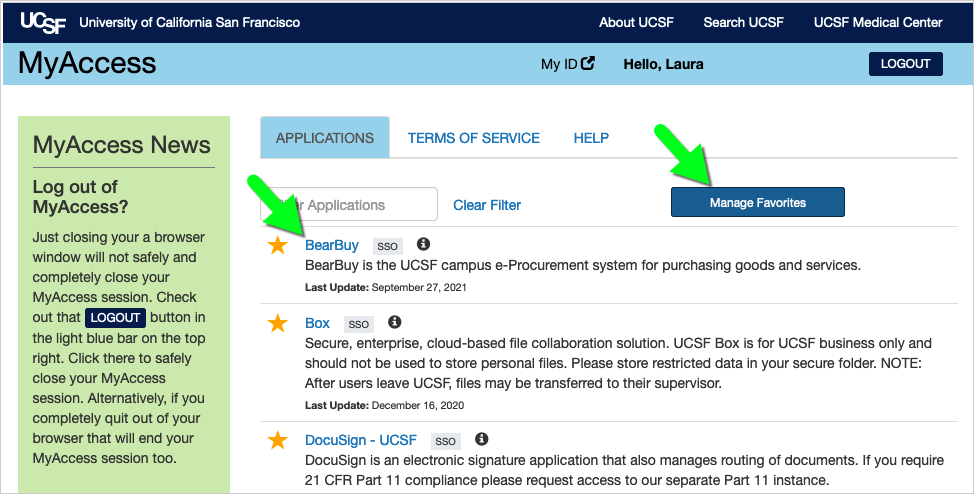
Accessing BearBuy
- Login to your UCSF MyAccess account.
- Click on the BearBuy link to open the application.
- Note: You may need to click on the Manage Favorites button to view the complete list of applications.
Quick Search by Document Number
- At the top of your BearBuy screen, select the document type from the dropdown (or select All).
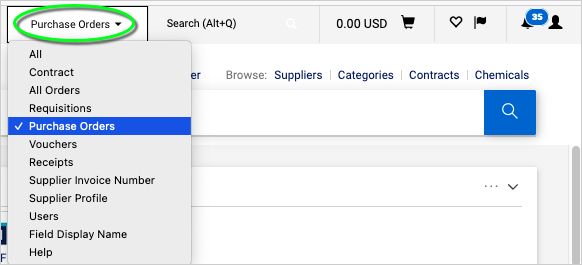
- Enter the document number, such as the PO Number. Then, press the Enter key on your keyboard or click the magnifying glass that appears within the search bar.

Document Search Instructions
These instructions explain your options when using document search. You may skip any irrelevant steps.
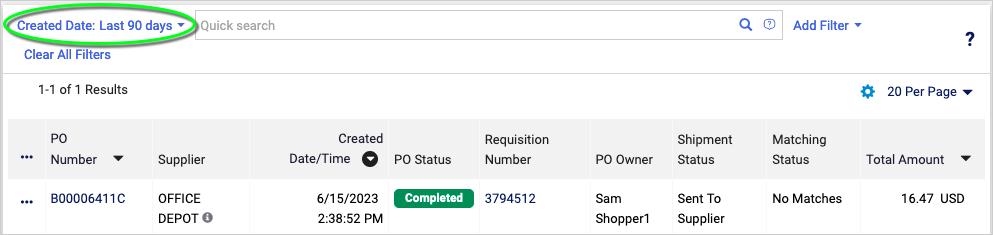
Note: The "Shipment Status" column is unrelated to the physical shipment of goods—this column only indicates whether the PO was dispatched to the supplier. To check on the status of your order/tracking, please contact the supplier directly; this information is not fed into BearBuy.
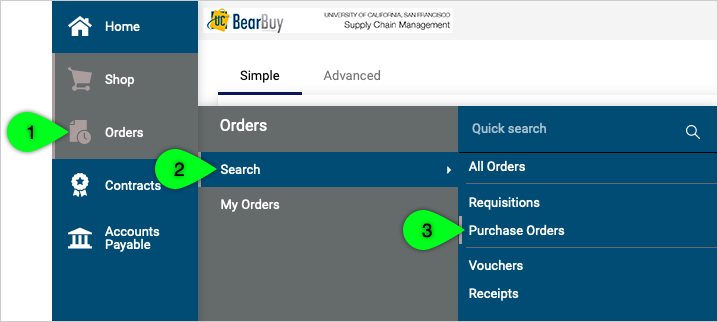
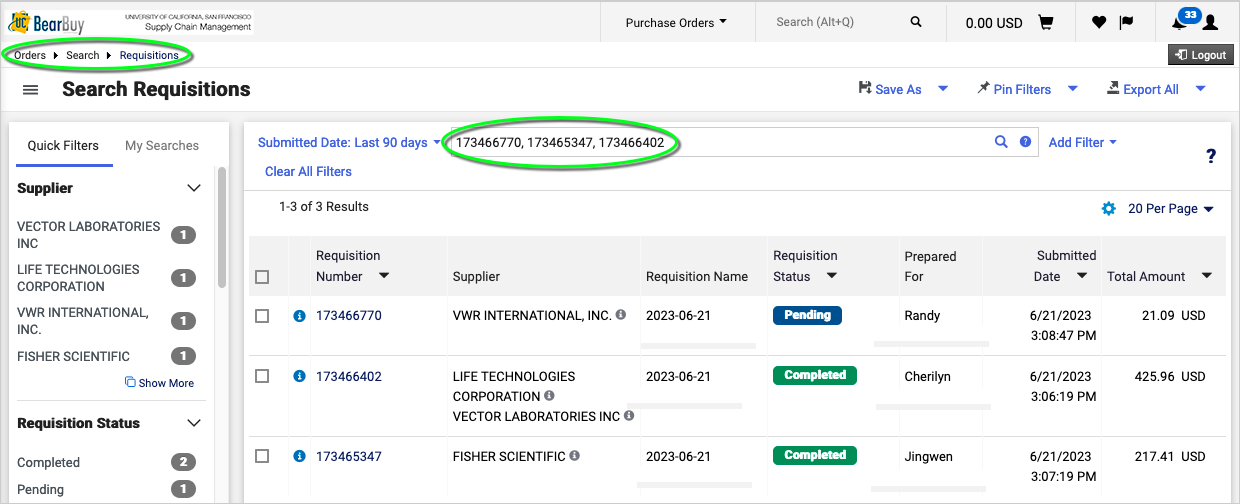
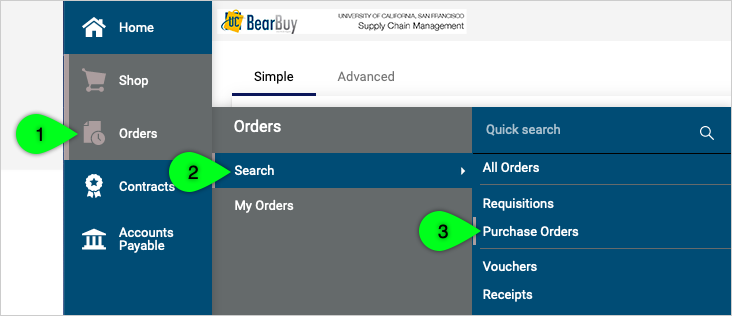
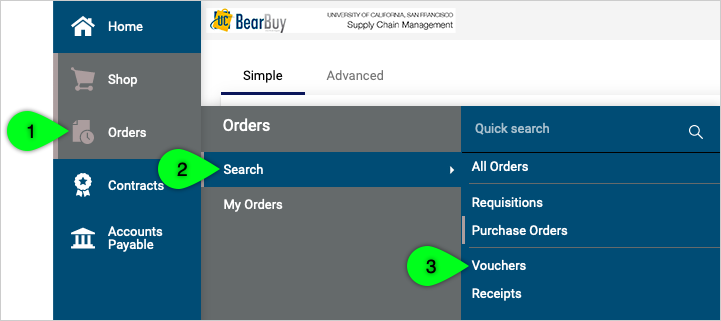
- MENU: From the menu on the left side of your screen, select Orders > Search > Purchase Orders (or another document type). Note: Selecting a document type is preferable to All Orders because this will enable you to select from a wider range of filters based on the specific document type.
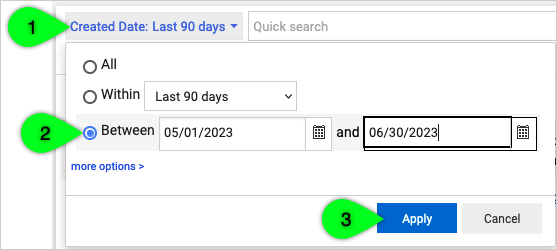
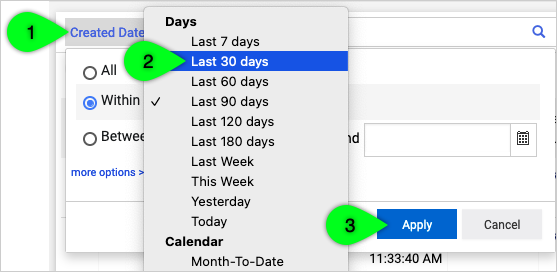
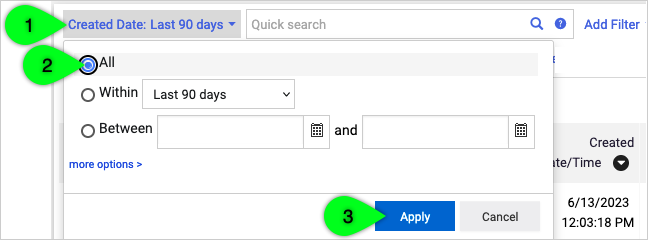
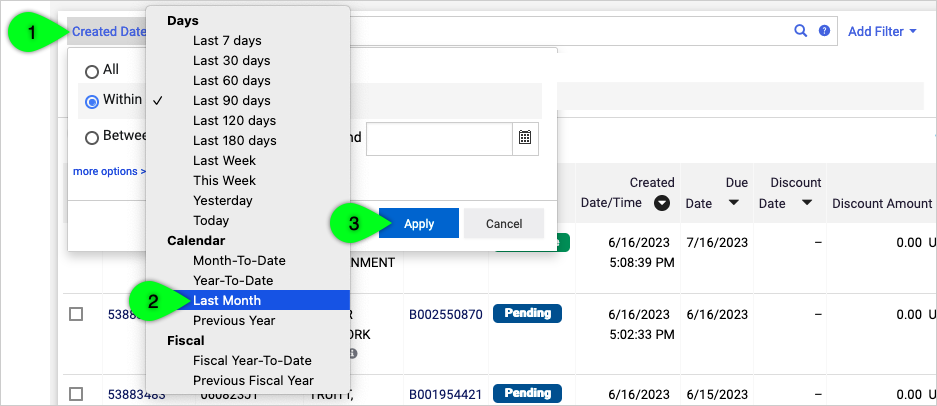
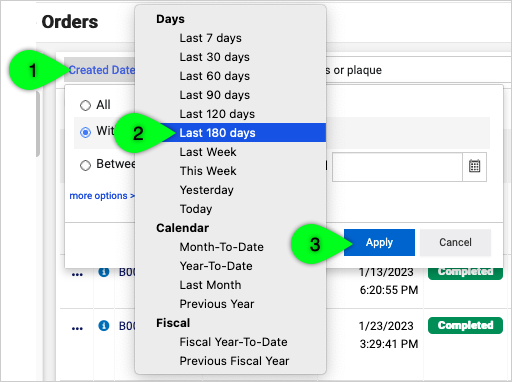
- DATE FILTER: The Date filter defaults to Last 90 Days. To adjust the Date range, click the Date filter and make a selection or enter the date range. Then, click the Apply button.

- QUICK SEARCH: Enter keywords or document numbers (such as Requisition Numbers) to quickly search for documents.
- Enter the word "or" between keywords. Example: trophy or trophies
- Use quotations marks to search exact phrases. Example: "Fisher Scientific"
- Enter a minus sign (-) to exclude words. Example: John -Johnson
- Use an asterisk (*) as a wildcard. Example: 123* will search for anything starting with 123.
- Enter question marks (?) as a placeholder. Example: 1234??56
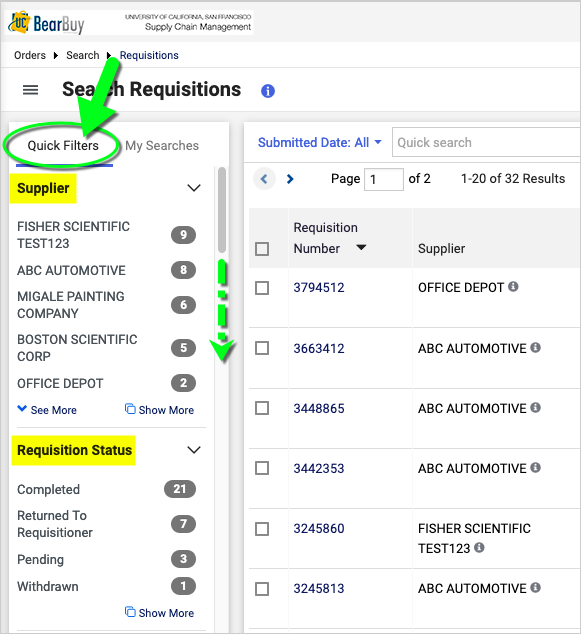
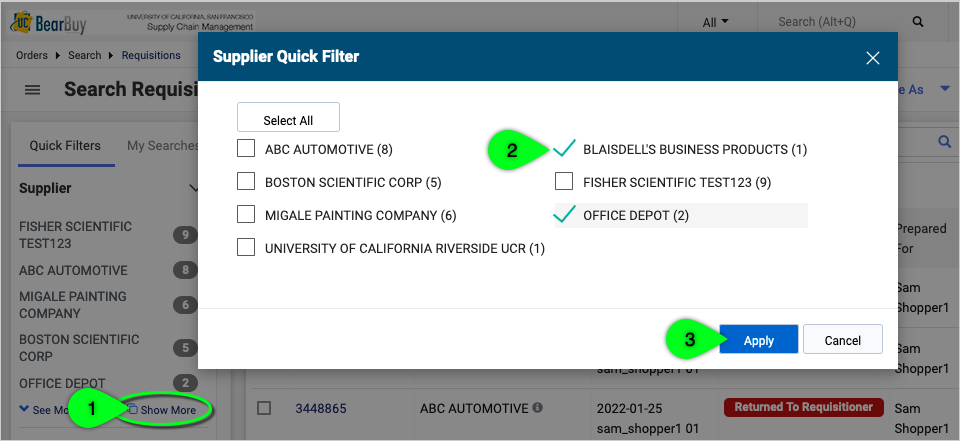
- QUICK FILTERS: Select from the filters on the left to quickly narrow your search results. To select multiple values for a filter, click Show More, make your selections, and then click Apply.
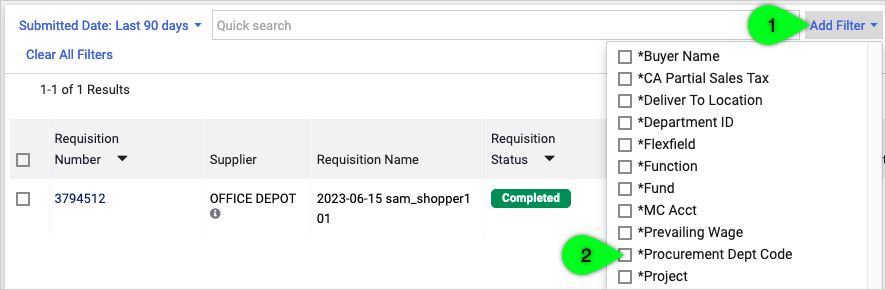
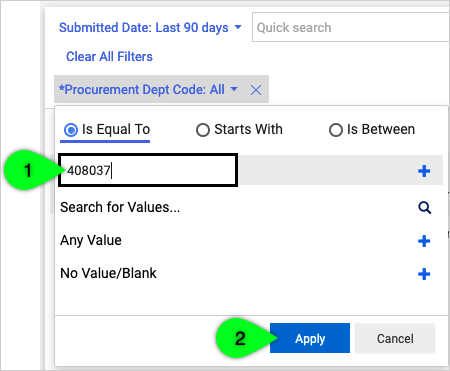
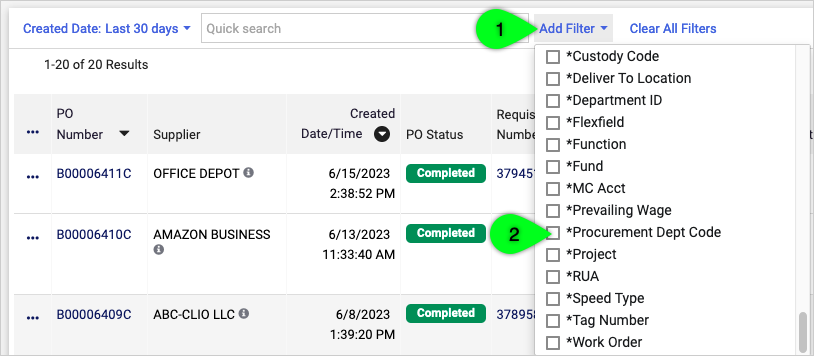
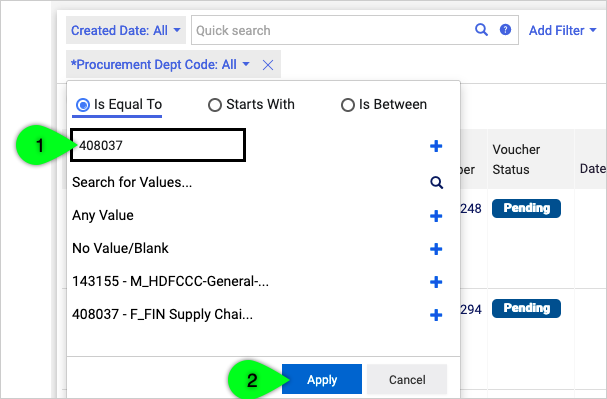
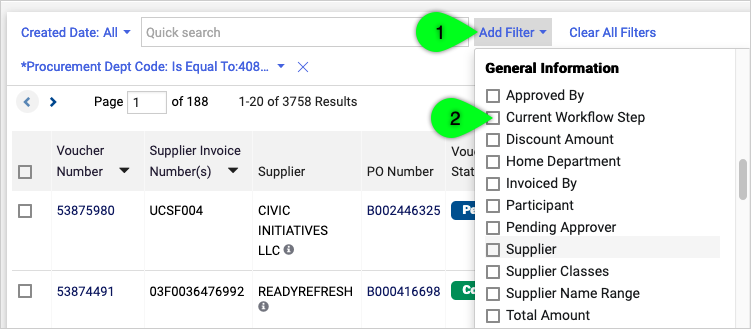
- FILTERS: Click the Add Filters link located to the right of the search bar to add other filters such as Procurement Dept Code or Project. After adding the filter, enter a value and click the Apply button. Tip: Select a value from the list of available values (if one appears as you type) for best results.
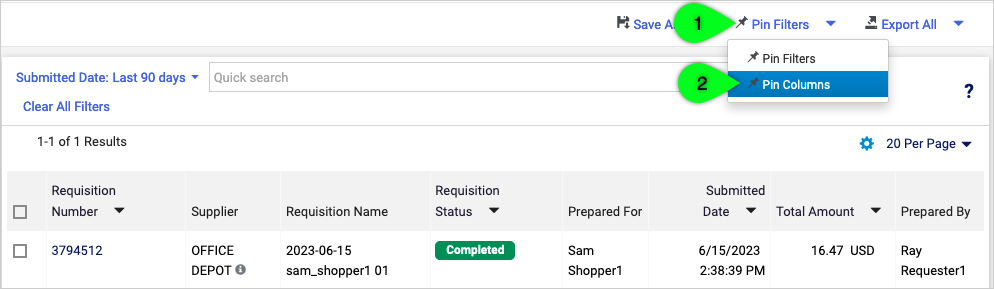
- PIN FILTERS: Click the Pin Filters icon to save these filters as your default view for future searches.

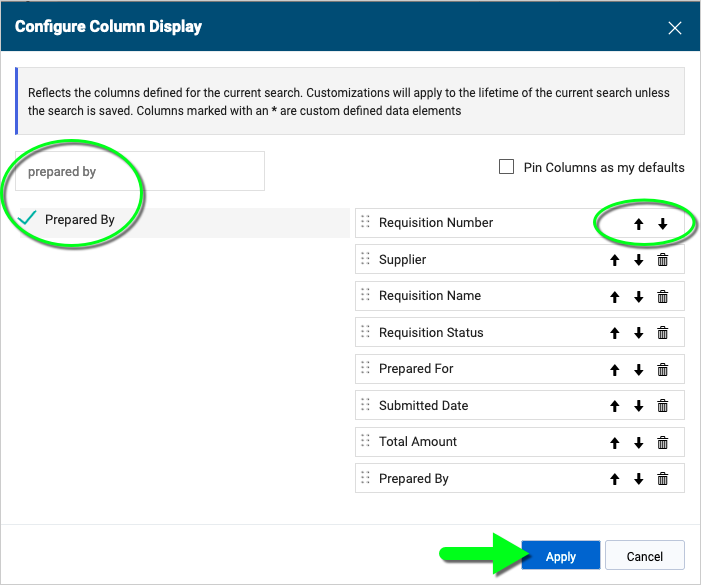
- COLUMNS: Click the Columns (gear) icon to add or remove columns and/or change the order of the columns.

- PIN COLUMNS: Click the down arrow next to the Pin Filters icon and select Pin Columns to save these columns as your default view for future searches.
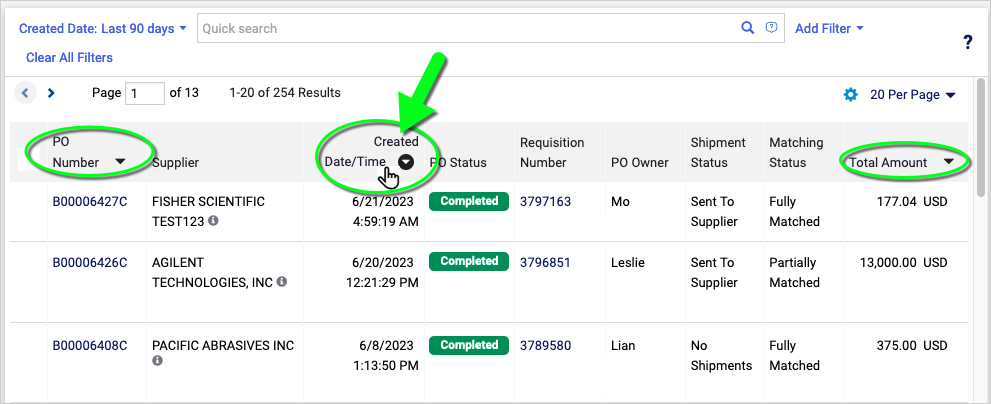
- SORT SEARCH RESULTS: Click on any column header with an arrow icon to sort your search results. A black circle around the arrow icon indicates the search results are currently sorted based on this column.
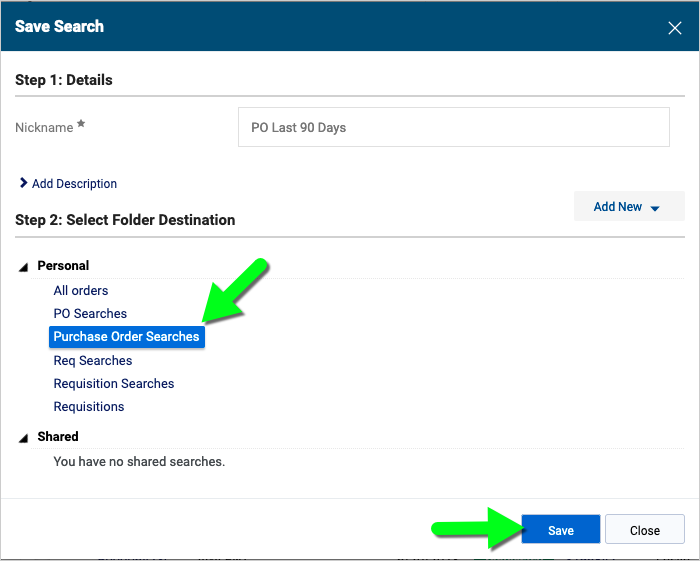
Save Search
- Click the Save As link located above the search bar.

- In the Save Search window, enter a Nickname for your search.
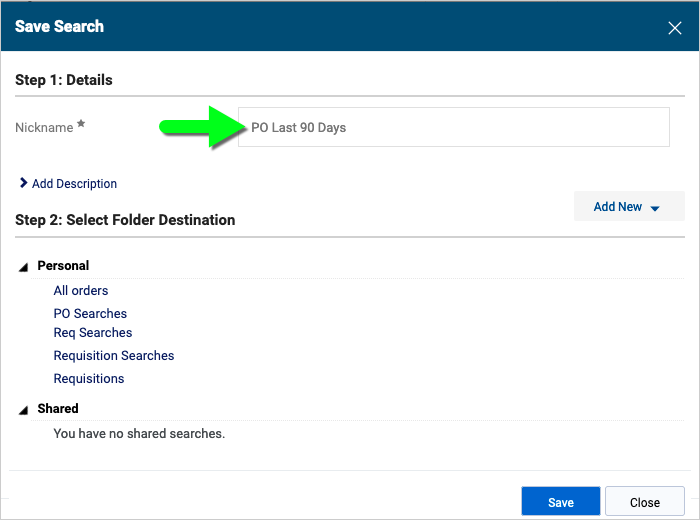
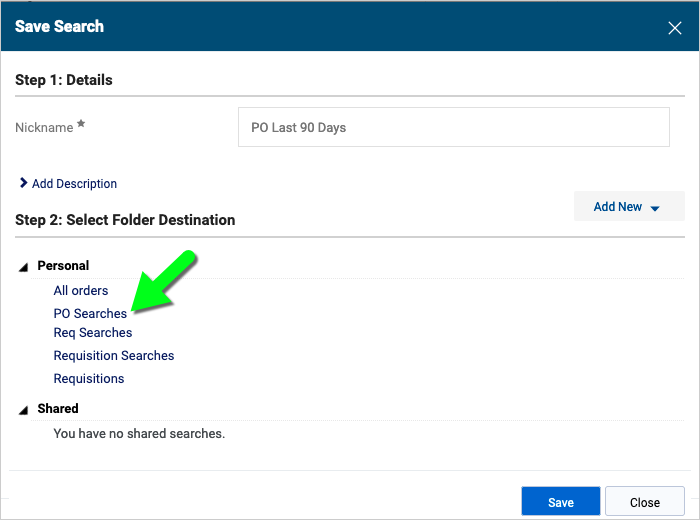
- Next, select a destination folder where you would like to save your search.
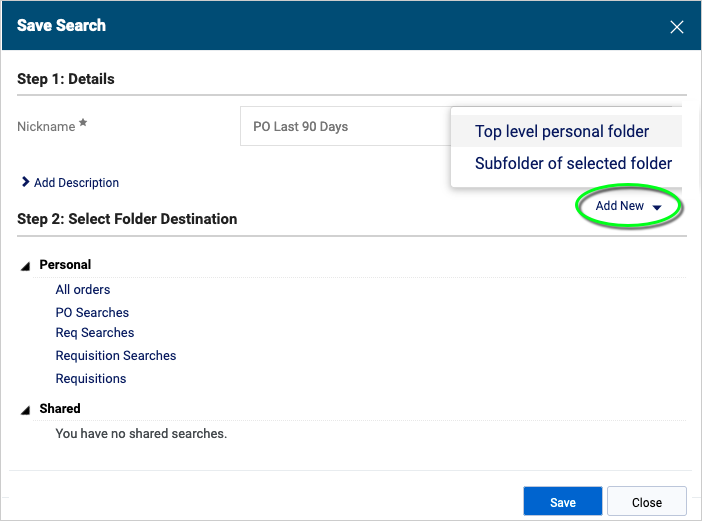
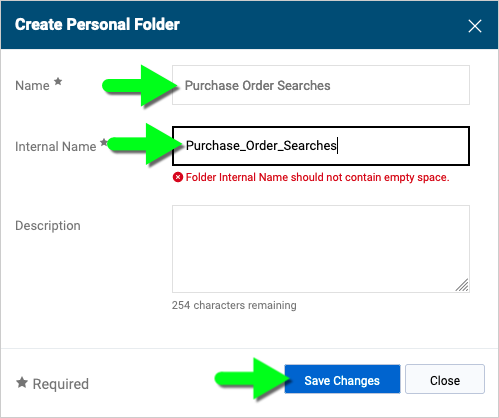
- Alternatively, you may create a new folder. In the Save Search window, select Add New > Top level personal folder; or select an existing folder > Add New > Subfolder of selected folder. In the Create Personal Folder window, give the folder a Name and Internal Name (no spaces allowed in the Internal Name). Finally, click Save Changes.
- Once you've selected a destination folder, click Save.
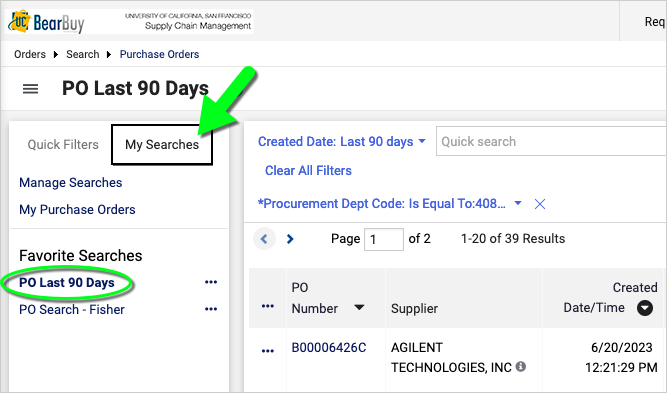
- To navigate to your saved search, click My Searches. (If you navigated away from Document Search, go back to Orders > Search > select the document type such as Purchase Orders.)
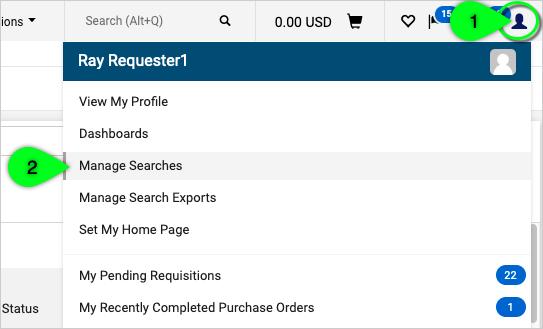
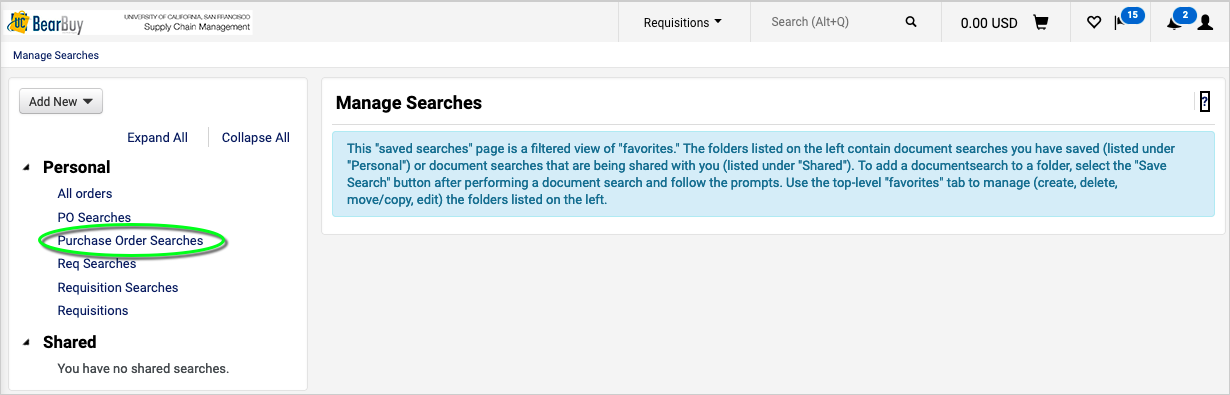
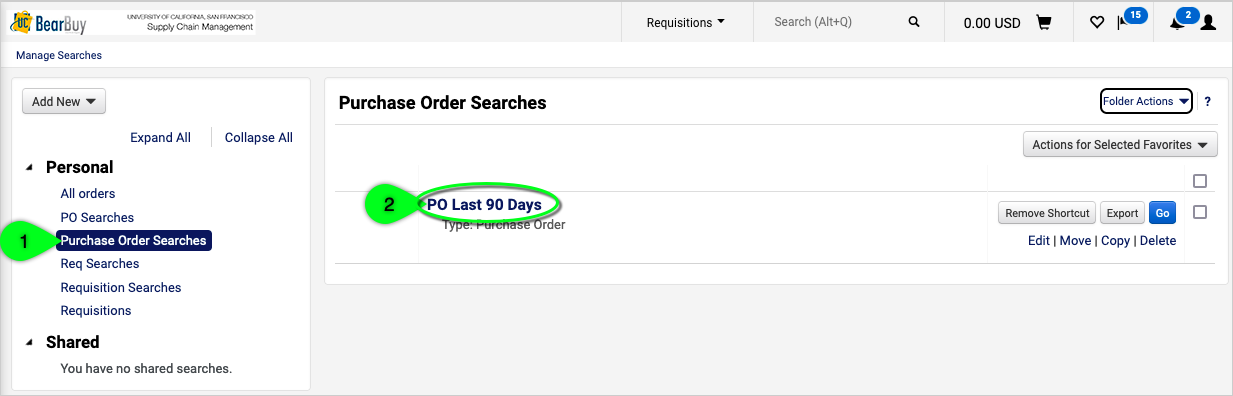
- If the search isn't listed under My Searches, click on your User profile icon (at the top right of your screen), and then select Manage Searches. Select from the list of folders on the left side of your screen, and then click on the search you'd like to run.
Export Search
- Click the Export All link (located above the search bar). Alternatively, click the down arrow next to Export All and select Export Selected Rows from the dropdown > checkboxes will now appear next to the rows in your search results > tick the checkboxes next to the rows you'd like to export > select the down arrow next to Export All again > select Export Selected Rows again.

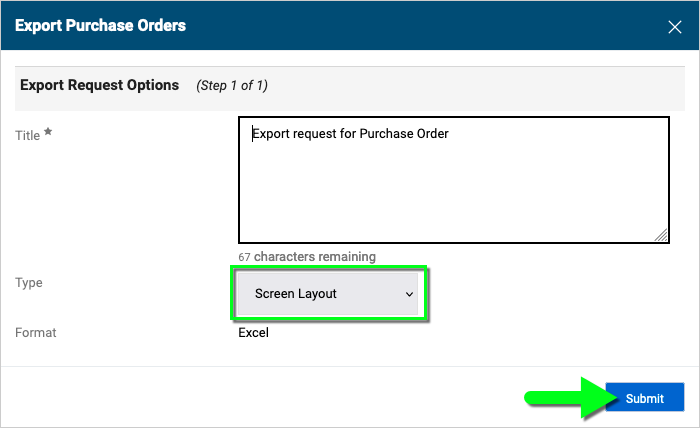
- In the Export window, make a selection from the Type dropdown; "Screen Layout" will export only the data and columns that appear in your search results, whereas "Full Export" will export additional details and columns. You may edit the Title of your export, if desired. Finally, click the Submit button.
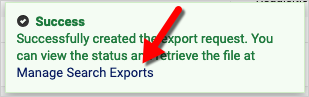
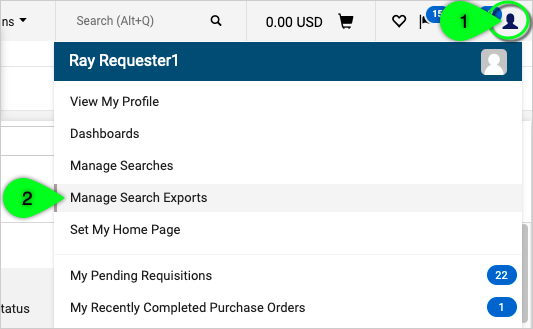
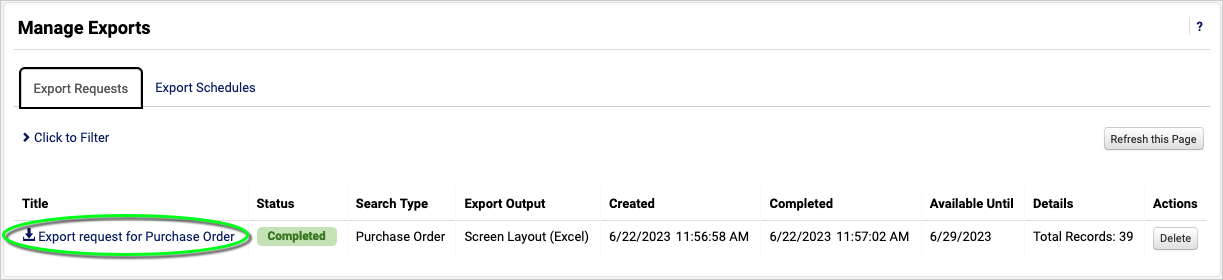
- To find your exports, click on the Manage Search Exports link that appears in the pop-up message. Otherwise, click on your User profile icon (at the top right of your screen) and select Manage Search Exports.
- Once the export is complete, the search Title becomes a clickable link—click to download/open your spreadsheet.
Examples: How do I find...
My department's ODP Business Solutions orders from the Last 30 Days
- From the menu on the left side of your screen, select Orders > Search > Purchase Orders.
- Click the Date filter, select Last 30 Days, and click the Apply button.
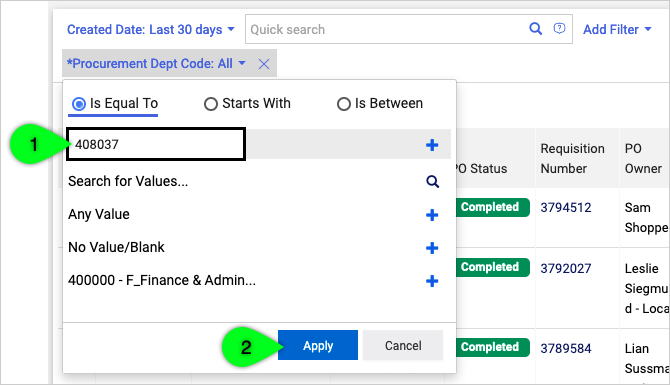
- Click the Add Filter link and select the Procurement Dept Code filter.
- In the Procurement Dept Code filter, enter the exact value (or select Starts With and enter the first few digits). Then, click the Apply button.
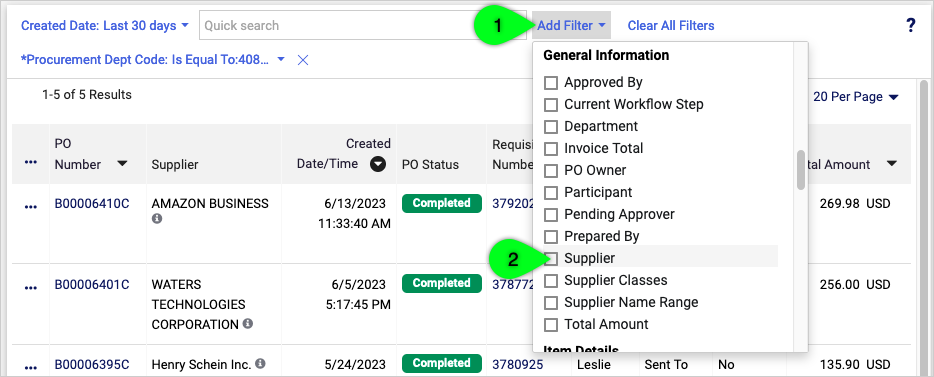
- Click the Add Filter link and select the Supplier filter.
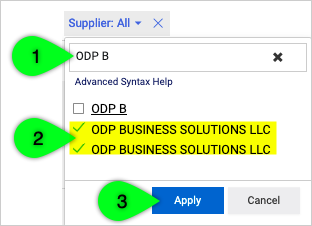
- In the Supplier filter, start typing ODP and check the boxes next to the supplier name(s). Then, click the Apply button.
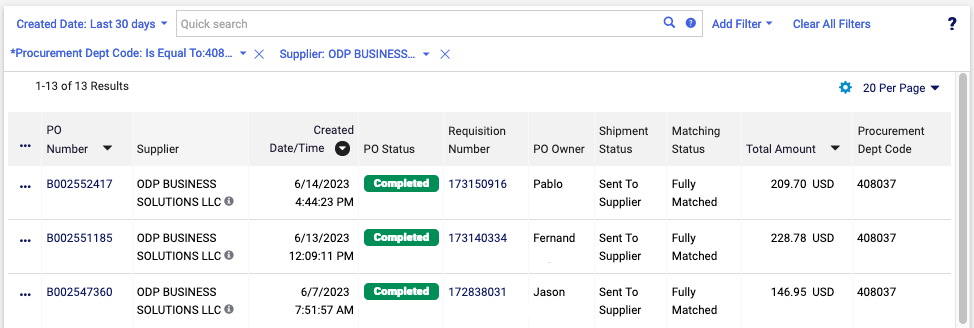
- The search displays your department's orders.
My department's pending Match Exceptions
- From the menu on the left side of your screen, select Orders > Search > Vouchers.
- Click the Date filter, select All, and click Apply.
- Click the Add Filter link and select the Procurement Dept Code filter.

- In the Procurement Dept Code filter, enter the exact value (or select Starts With and enter the first few digits). Then, click the Apply button.
- Click the Add Filter link and select the Current Workflow Step filter.
- In the Current Workflow Step filter, select Match Exceptions. Then, click the Apply button. Note: If the Match Exceptions option doesn't appear, you may need to type "Match Exceptions" into the filter's search bar. Otherwise, it could mean there are no vouchers pending Match Exceptions at this time.

- The search displays your department's vouchers that are currently pending Match Exceptions approval. From here, I can click the Voucher number to view the voucher details.
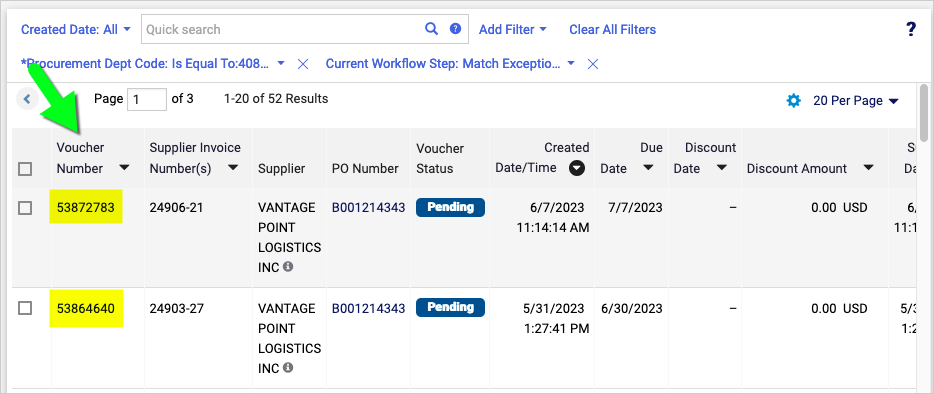
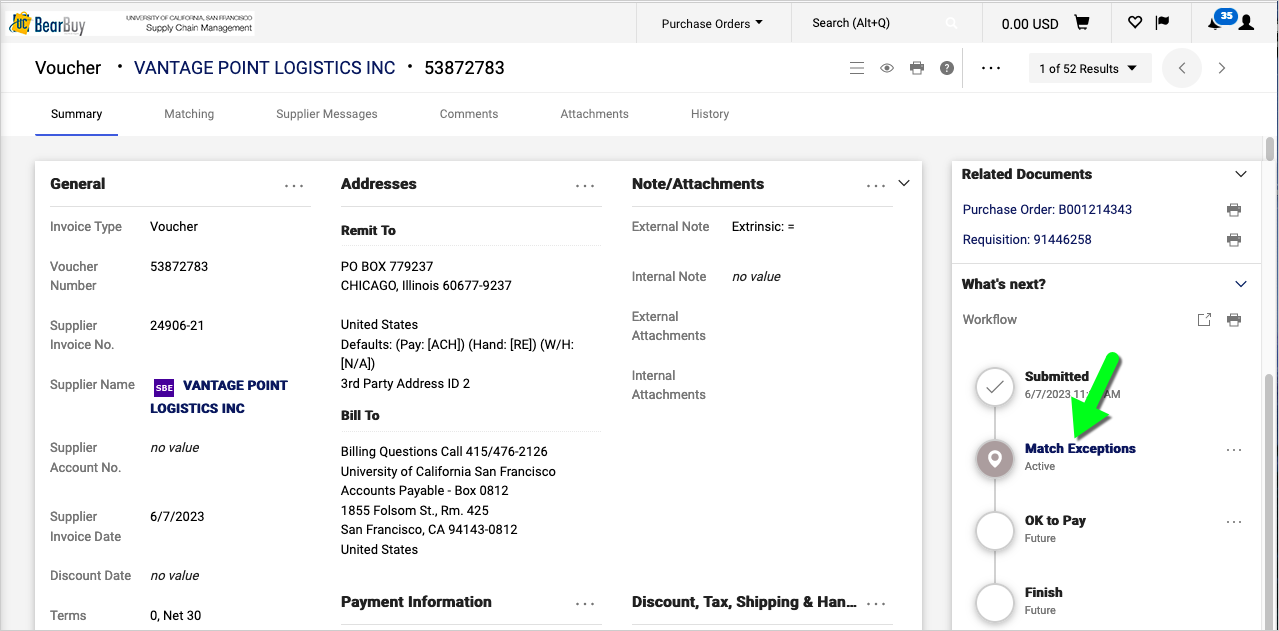
- On the voucher, view the workflow on the right and click the Match Exceptions workflow step to view who can approve the voucher.
Invoices approved Last Month by a certain Approver
- From the menu on the left side of your screen, select Orders > Search > Vouchers.
- Click the Date filter and select Last Month. Then, click the Apply button.
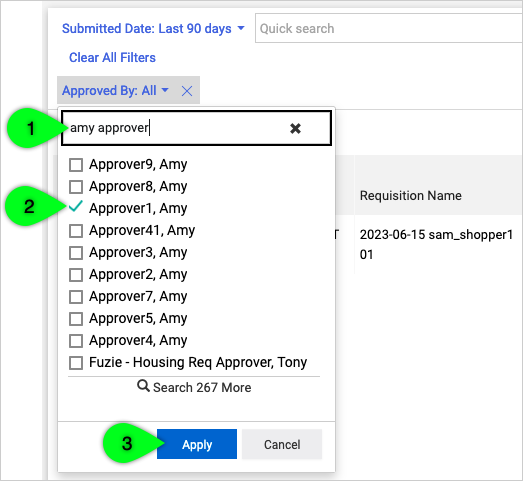
- Click the Add Filter link and select the Approved By filter.
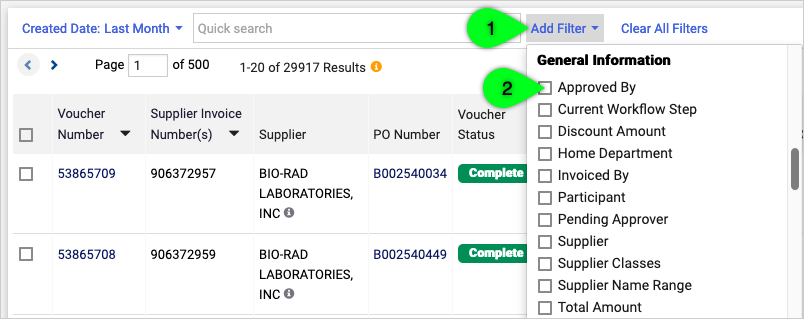
- In the Approved By filter, start typing the person's name and select their name. Then, click the Apply button.
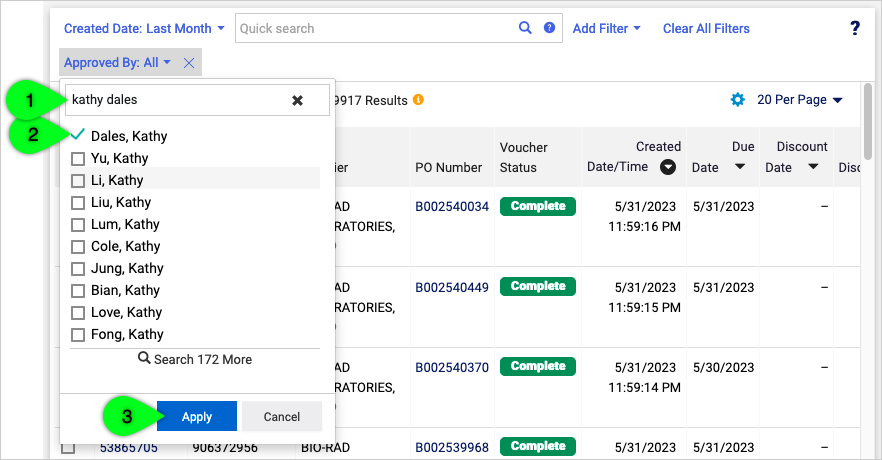
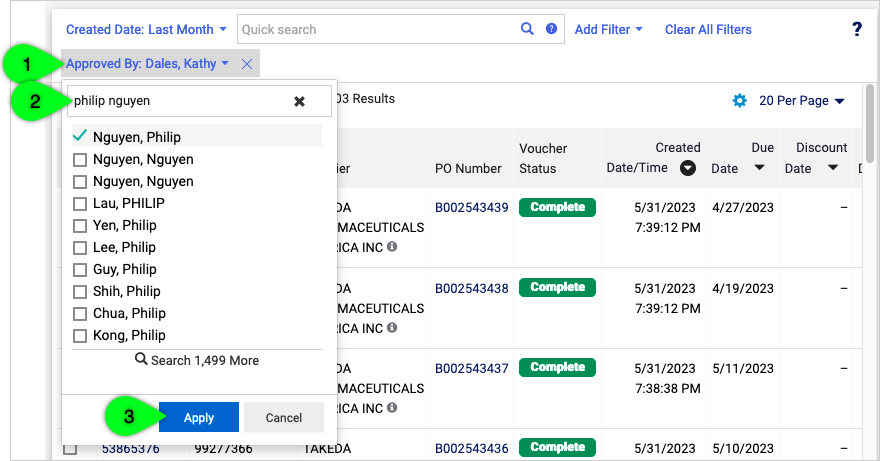
- To search for more than one Approver, click the Approved By filter, start typing the Approver's name and select their name. Then, click the Apply button.
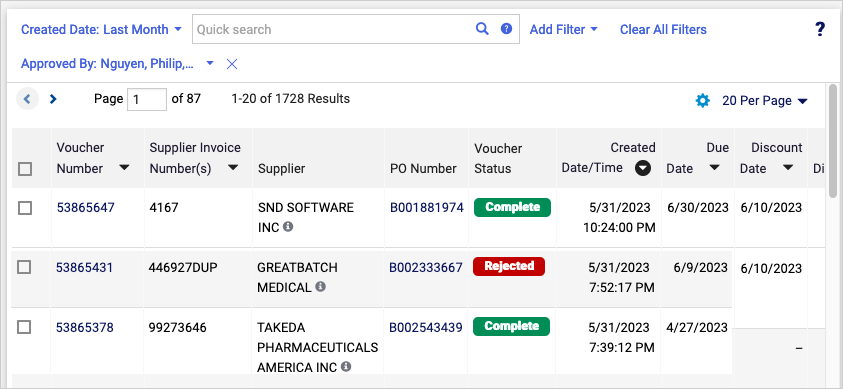
- The search displays vouchers that were approved or rejected by the Approvers.
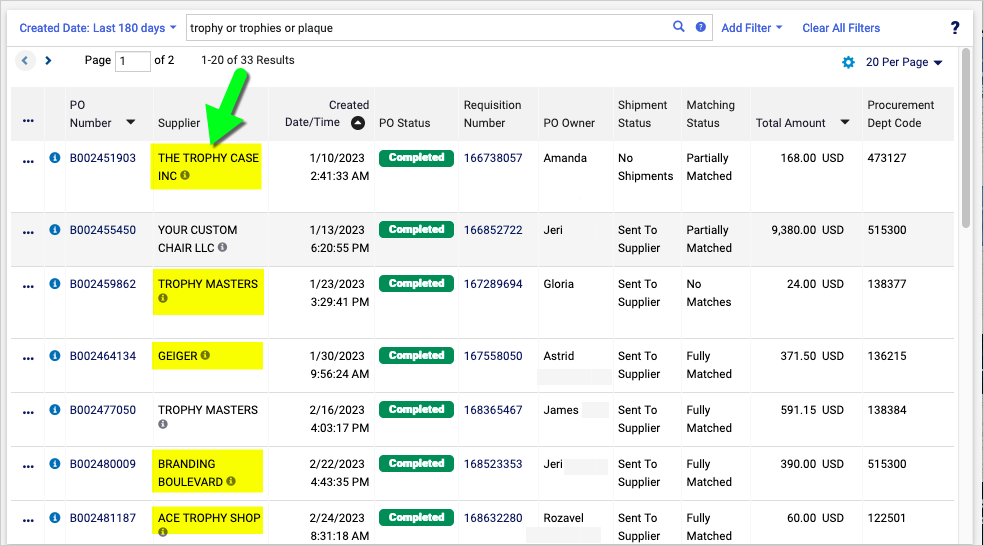
A supplier that sells trophies/plaques
- From the menu on the left side of your screen, select Orders > Search > Purchase Orders.
- In the search bar, enter your keywords such as trophy or trophies or plaque. Then, press the Enter key on your keyboard or click the magnifying glass that appears within the search bar
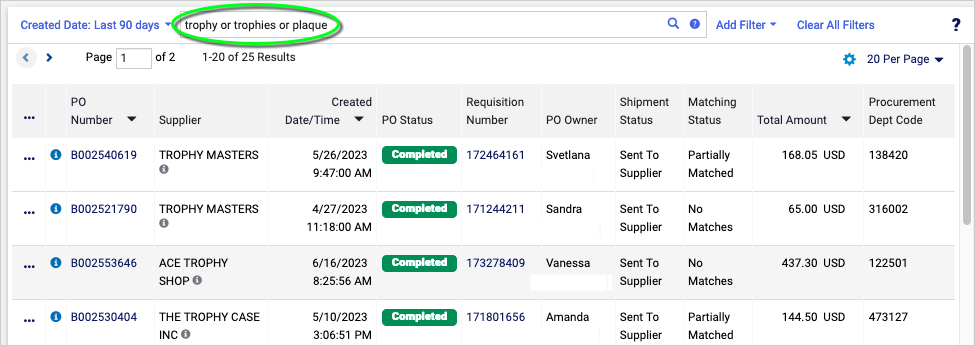
- The Date filter defaults to Last 90 Days. Click the Date filter and select Last 180 Days (or whatever range is reasonable), and then click Apply.
- The search results include several different suppliers that sell trophies and plaques. I can click on the PO Numbers to view the order details, and I can start searching online for the supplier's website to find product selections, pricing, and contact information. For this type of order, I'll probably need to contact the supplier to obtain a quote and make sure they can fulfill my order by the date I need the awards. Note: To order products from a supplier that is not yet listed in BearBuy, please ask the supplier to complete the appropriate Supplier Registration Form.