Overview
Requisition Approvers review and approve their department’s BearBuy submissions. This training demonstrates how to access pending orders in BearBuy and take action on the requisition.
Orders > $500 and certain transactions, such as Payment Requests, require approval.
When a requisition requires approval, you will receive a notification email from BearBuy.
The system determines who can approve the requisition based on the Procurement Dept Code entered on the order. Your department may have more than one Requisition Approver, any of whom can approve the requisition.
As a Requisition Approver, you may be added to a requisition as an Optional Approver (Pre-Approver or Ad Hoc Approver) by your department’s Requester. In this case, only you can approve the requisition.
Requisition Approvers can approve or reject the requisition or return it to the Requester to edit and resubmit. The Requisition Approver cannot edit the requisition.
Accessing BearBuy
- Login to your UCSF MyAccess account.
- Click on the BearBuy link to open the application.
Set Up Your Approval Code (optional)
Saving an Approval Code in your profile enables you to approve a requisition from your email (without logging into BearBuy).
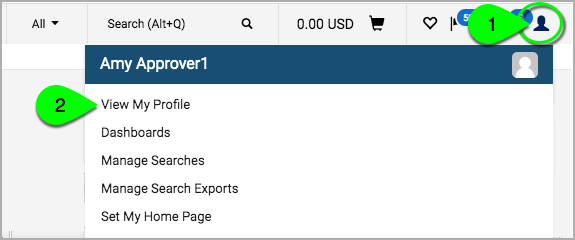
- Click your User Profile icon at the top of BearBuy, and then click View My Profile.
- On the left, select Update Security Settings, and then Change Email Approval Code.
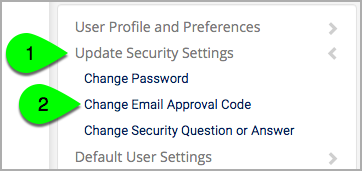
- Enter your desired Approval Code in the Email Approval Password box. The Approval Code can be alphanumeric and must be at least 6 characters.
- Click the Save Changes button.
The next time you receive an email requesting your approval on a requisition, you will have the option to redirect to an interim page to approve the requisition using your Approval Code.
Notifications
When a requisition requires approval, you will receive a notification email from BearBuy.
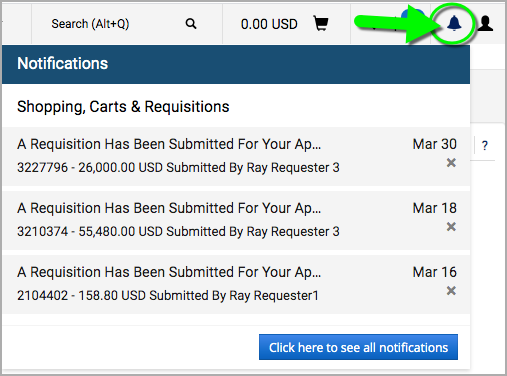
Within BearBuy, you can view your notifications by clicking on the Notifications bell icon at the top of the page. Click on an item from the list to navigate to that requisition.
Action Items & Approval Folders
To quickly access pending requisitions, click the Action Items flag at the top of BearBuy.
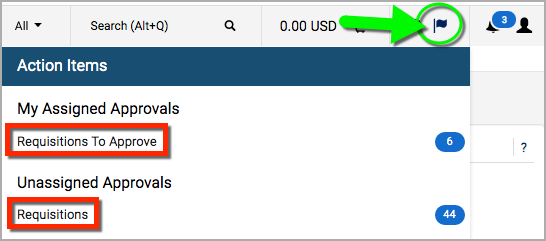
- My Assigned Approvals > Requisitions to Approve lists requisitions that are assigned to you and pending your approval. Clicking the link will take you to your My PR Approvals folder, which contains only requisitions assigned to you.
- Unassigned Approvals > Requisitions lists requisitions for your department that are not yet assigned to an individual approver. Clicking the link will take you to your department’s shared approval folders. You can assign requisitions to yourself from the shared folders to approve.
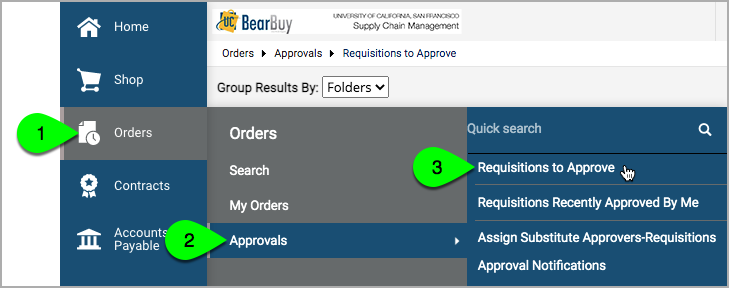
Approval folders can also be accessed from the menu on the left, go to Orders > Approvals > Requisitions to Approve.
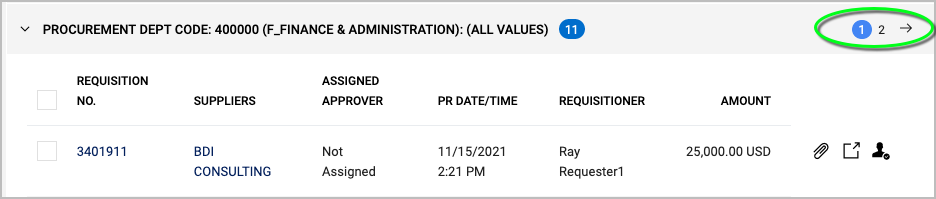
WARNING: By default, pending requisitions will be organized into folders. Be aware that you may need to use the Page arrows next to the folder header to view all of the requisitions in the folder.
Approve a Requisition
Before approving a requisition, carefully review the requisition for accuracy and compliance.
- Go to your Action Items or Orders > Approvals > Requisitions to Approve.
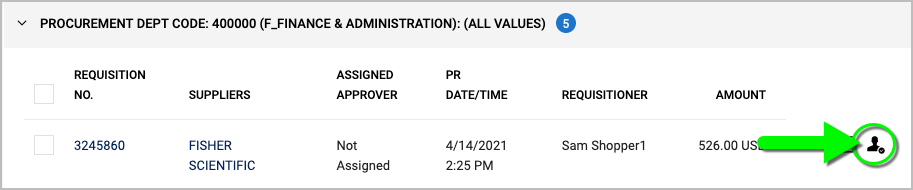
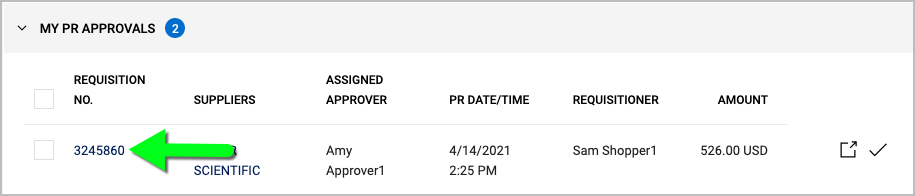
- Assign the requisition to yourself by clicking the Approver icon located to the right. (The requisition now appears in your My PR Approvals folder, indicating that it is assigned to you.)
- Click the Requisition No. to view the requisition.
- Review the requisition for accuracy and compliance.
- Select the Approve button located on the right side. (Alternatively, click the Approve & Show Next button. This will approve the requisition and then redirect you to the next requisition in your folder.)

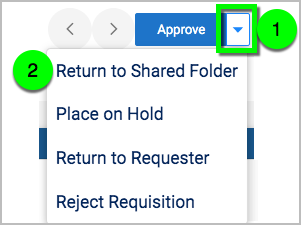
Return a Requisition to the Requester
Returning a requisition means that you are sending the requisition back to your department’s Requester for review or re-work.
- Go to your Action Items or Orders > Approvals > Requisitions to Approve.
- Assign the requisition to yourself by clicking the Approver icon located to the right. (The requisition now appears in your My PR Approvals folder, indicating that it is assigned to you.)
- Click the Requisition No. to view the requisition.
- Review the requisition for accuracy and compliance.
- Click the down arrow to the right of the Approve button and select Return to Requester.
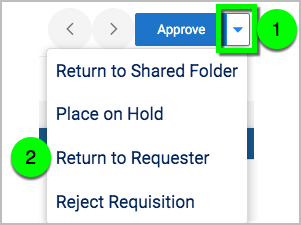
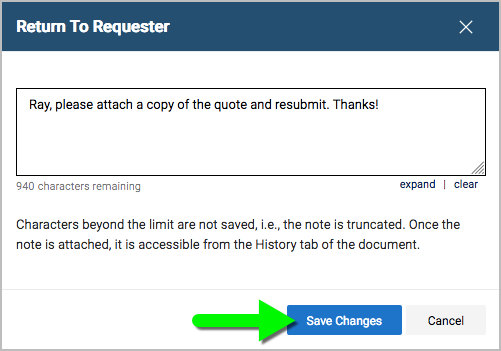
- In the pop-up window, enter a message to help the Requester understand why you are returning the requisition, and then click the Save Changes button.
Reject a Requisition
Warning: Rejecting the requisition is permanent; the order cannot be edited or resubmitted. Carefully consider whether returning the requisition to the Requester is more appropriate.
- Go to your Action Items or Orders > Approvals > Requisitions to Approve.
- Assign the requisition to yourself by clicking the Approver icon located to the right. (The requisition now appears in your My PR Approvals folder, indicating that it is assigned to you.)
- Click the Requisition No. to view the requisition.
- Review the requisition for accuracy and compliance.
- Click the down arrow to the right of the Approve button and select Reject Requisition.
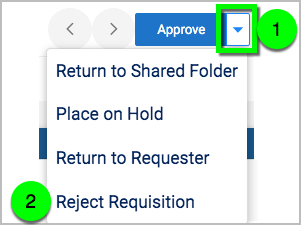
- Enter an explanation for recordkeeping purposes. Then, click the Reject Requisition button. The requisition is now rejected, and the owner of the order will be notified.
Helpful Hint: Although the Shopper/Requester cannot resubmit a rejected requisition, they can copy the order to a new cart, which they can then edit and submit as a new order.
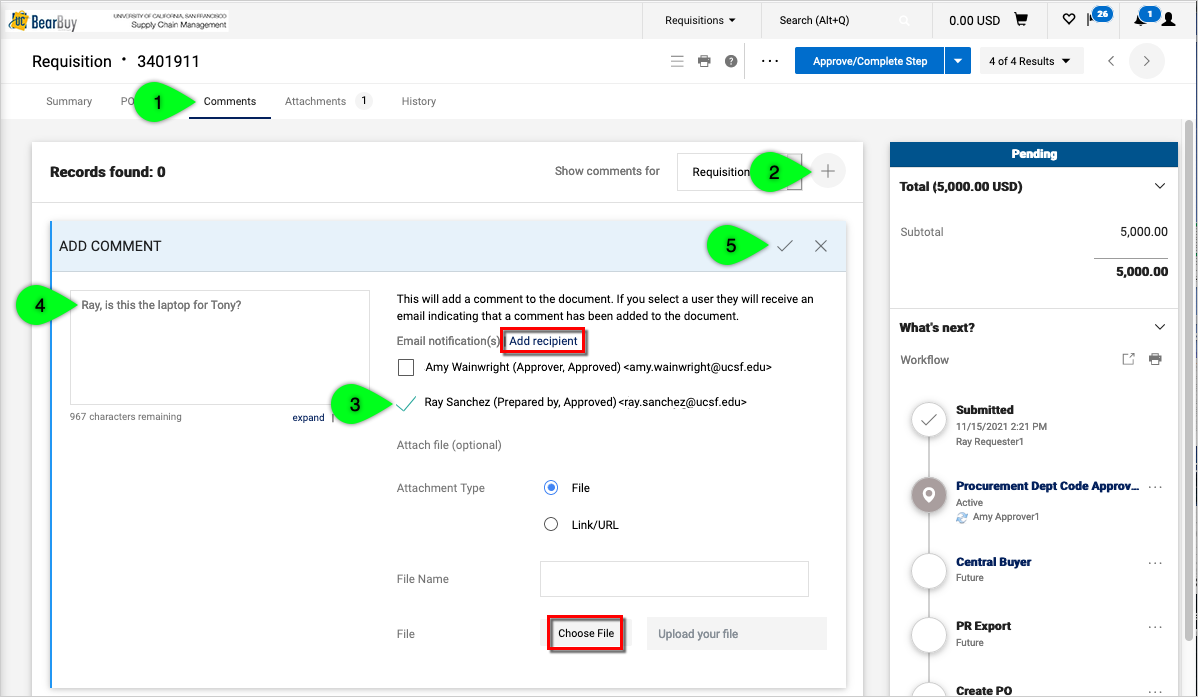
Communicate Using BearBuy Comments
Approvers can add a pertinent comment to a pending requisition. The comment will remain internal only—it will not appear on the Purchase Order (PO).
- On the requisition, click on the Comments tab at the top.
- Click the Plus sign on the right.
- Select a recipient for your comment (if desired). The "Prepared by" is the Requester who submitted the order. To select a different recipient, use the Add recipient link.
- Enter your comments in the text box. To upload an attachment, use the Choose File link.
- When finished, click the Checkmark.
View Recent Approvals
- Go to Orders > Approvals > Requisitions Recently Approved By Me.
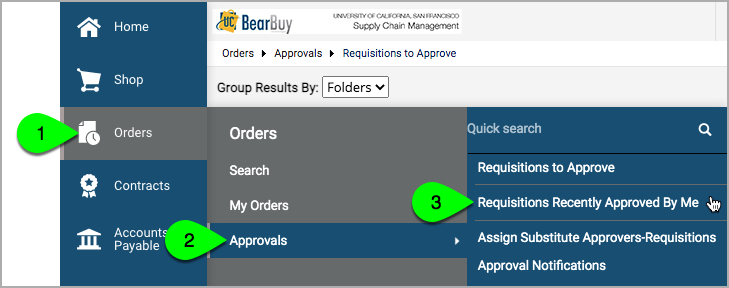
- By default, the page lists requisitions you approved, rejected, or returned in the Last 30 Days. Adjust the filters as needed.
Assign a Substitute Approver
It may be necessary to set a substitute approver if you are the only Requisition Approver for a particular Procurement Dept Code and you will be out of the office. The substitute will be able to review and approve/reject requisitions on your behalf. Only individuals with the Requisition Approver role can be selected as a substitute.
Note: The substitute can't approve requisitions that were assigned to you, even if you set a substitute for your My PR Approvals folder. If necessary, return the requisitions to the shared approval folder.
To set a substitute:
- Go to Orders > Approvals > Assign Substitute Approvers-Requisitions.
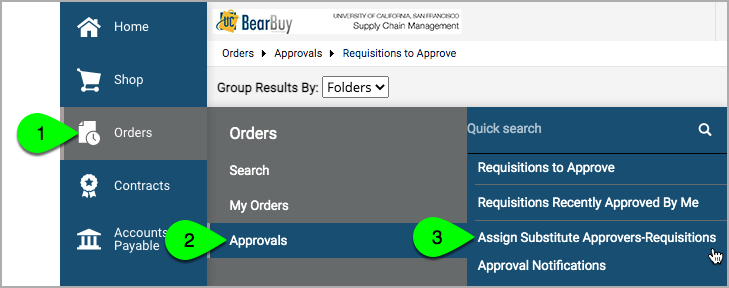
- Click the Assign Substitute to All Requisitions Folders button at the top. (Alternatively, to set a substitute for only one folder, click the Assign button located to the right of the folder. To set a substitute for several folders, select the checkbox to the right of each folder, click the Substitute Actions button located above your approval folders, and then select Assign Substitute to Selected Folders.)

- In the Assign Substitute pop-up box, enter the person’s name in the Substitute Name field, and select their name.
- Then, select the checkbox to include a date range. Enter the State Date and End Date, and click the Assign button.
Note: If you do not include a date range, the substitution will start immediately, with no end. You will need to manually end the substitution when you are ready. You can manually end a substitution before the end date, or end a substitution that had no preset end date.
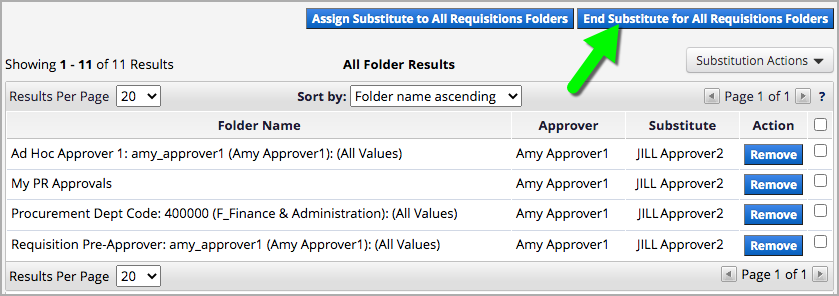
To end the substitution:
- Go to Orders > Approvals > Assign Substitute Approvers-Requisitions.
- Click the End Substitute for All Requisitions Folders button at the top. (Alternatively, to end a substitution for a specific folder, click the Remove button located to the right of the folder. To end a substitution for several folders, select the checkbox to the right of each folder, click the Substitute Actions button located above your approval folders, and then select Remove Substitute from Selected Folders.)
Frequently Asked Questions
- Why do I have more than one approval folder? You may have the Requisition Approver role for more than one Procurement Dept Code, or your department's Requester may have added you to a requisition as an Optional Approver (Pre-Approver or Ad Hoc Approver). Also, once you assign a requisition to yourself, it will appear in your My PR Approvals folder in addition to the shared folder. (Folders will not be displayed if there are no pending requisitions.)
- I received an email notification, but I don’t see the requisition in the approval folder. What happened? Another Approver already approved it, or it was Withdrawn by the Requester.
- Can my manager reassign requisitions in the shared department folder while I am out of the office? Only if the manager has the Requisition Approver role for that Procurement Dept Code or you set your manager as your substitute (they must have the Requisition Approver role to be selected as a substitute). Otherwise, your manager will not have access to the shared folder.
- How do I return a requisition that is assigned to me back to the shared folder for someone else to approve? Click the down arrow to the right of the Approve button, and select Return to Shared Folder.
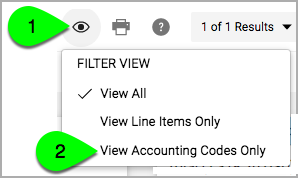
- How can I tell if the Accounting Codes are different for some of the line items on the order? Click the eye icon in the upper right corner of the requisition, and select View Accounting Codes Only. Select View All to return to the original view.