Overview
Requesters review shopping carts and submit orders (on behalf of individuals in their department) in the BearBuy system. This training outlines the role and its responsibilities.
Getting Started
Anyone with a UCSF MyAccess account can log into BearBuy and place items into a shopping cart. However, only Requesters can submit orders. Requesters are responsible for completing the checkout process on behalf of other users, including entering the Accounting Codes and double-checking order details, such as the Shipping Address.
Most purchases < $500 will not route for further approval. Therefore, the Requester must have a solid understanding of accounting/funding sources.
Note: When a shopping cart is going through checkout or approvals, it may be referred to as a "requisition". Once the requisition is fully approved, the purchase order (PO) will be generated.
These training materials explain how to complete the checkout process and submit orders. For detailed instructions on how to shop and create carts, review the Shopper training.
Accessing BearBuy
- Login to your UCSF MyAccess account, and go to the App Library.
- Search for BearBuy, and click the Launch button to open the application.
Note: You may need to click the All Applications tab before you search.
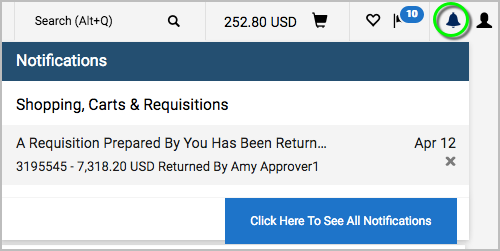
Notifications
You will receive a notification email from BearBuy when a Shopper assigns a shopping cart to you or when a requisition that you submitted is returned to you.
Within BearBuy, you can view certain notifications by clicking the Notifications bell at the top of the page. Click on an item from the list to navigate to that requisition.
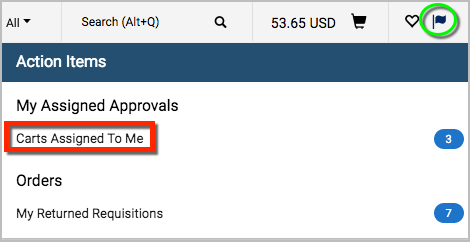
Action Items
To quickly access your shopping carts, click the Action Items flag at the top of BearBuy.

- Carts Assigned To Me lists carts assigned to you by a Shopper. It will also list orders you submitted for a Shopper that were returned to you by your department's Approver, your Department-Assigned Buyer, or the BearBuy system. Clicking the link will take you to your Assigned Carts.
- My Returned Requisitions lists carts you started yourself and submitted that were then returned to you by your department's Approver, your Department-Assigned Buyer, or the BearBuy system. Clicking the link will take you to your Draft Carts.
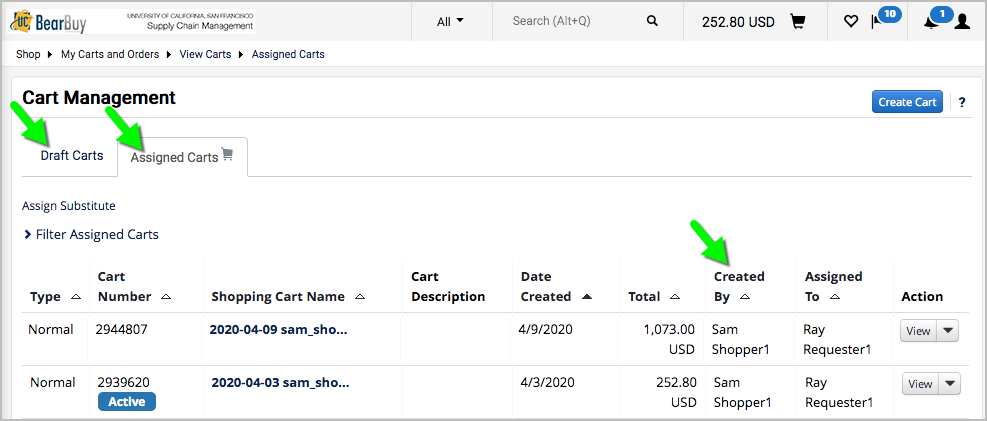
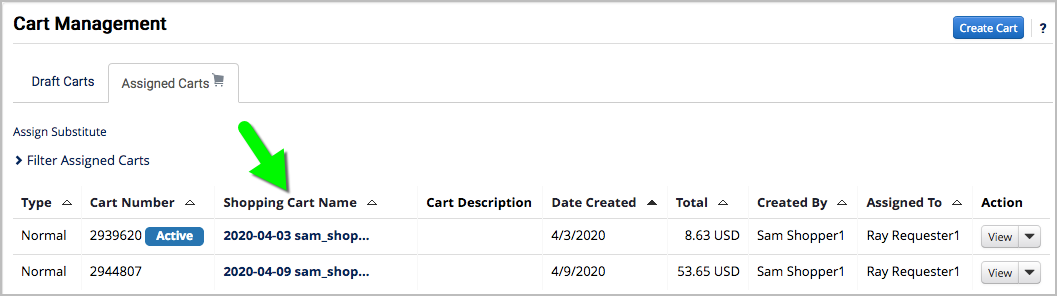
- Click on the Shopping Cart Name to view the order details.
Return a Cart to the Shopper
You may want to return a cart to the Shopper to make edits.
- Go to your Action Items > Carts Assigned To Me.
- On the Cart Management page, click on the Shopping Cart Name to view the order details.
- From here, select the Return Cart button to return the cart to the Shopper.

Checkout and Place Order
- When you are finished adding/editing items in the cart, click the Proceed to Checkout button.

- From here, you may enter the Procurement Dept Code, Accounting Codes, and Shipping Address. Click the pencil icon next to each section to make edits.
- Make any other relevant selections on the requisition, or add External Notes or Attachments as needed. External Notes will appear on the PO that is sent to the supplier, and External Attachments will be sent along with the PO as a separate document.
- When finished, click the Place Order button.

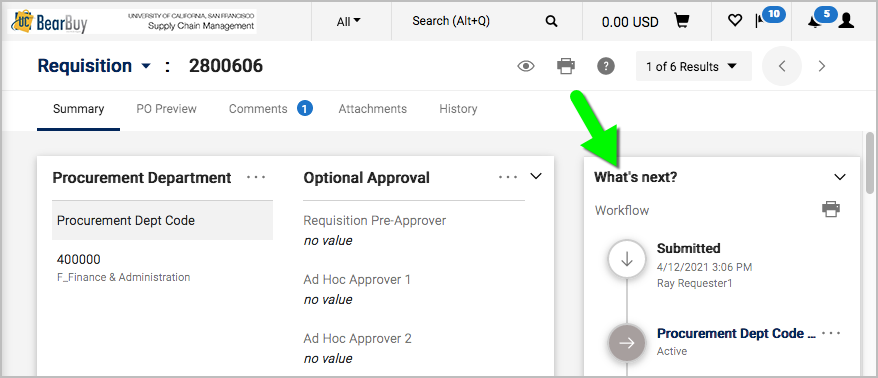
- After the requisition is submitted, it will undergo approvals in BearBuy based on the type of transaction and the dollar amount. The approvals workflow appears on the right side of the requisition.
- Next steps: Before the requisition is fully approved, you may withdraw the requisition to cancel the order. Also, the requisition may be returned to you by your department's Approver or Department-Assigned Buyer to make edits and resubmit. Requisitions may also be returned to you by the BearBuy system if the Accounting Codes are invalid or other errors are detected. You will receive an email notification if the requisition is returned.
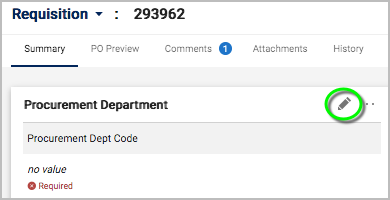
Checkout: Procurement Dept Code
The Procurement Dept Code signifies which department owns the order and dictates which users can approve the order or associated invoices.
- When you are finished adding/editing items in the cart, click the Proceed to Checkout button.

- Under the Requisition Summary tab, click the pencil icon next to the Procurement Department section.
- Click the arrow within the Procurement Dept Code box. Then, make a selection from the list that appears.
- Finally, click the Save Changes button.

Checkout: Accounting Codes
- When you are finished adding/editing items in the cart, click the Proceed to Checkout button.
- Under the Requisition Summary tab, click the pencil icon next to the Accounting Codes section. Note: The funding information entered in the Accounting Codes section will apply to all items on the order, unless you specify different codes for a line item. To enter Accounting Codes for a specific line item, click the ellipses next to the line, and then select Accounting Code from the pop-up menu.
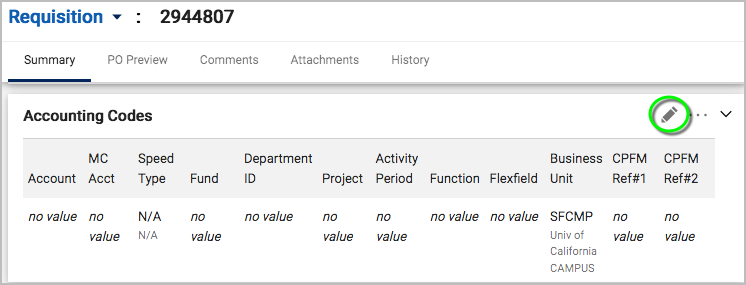

- Enter your chartstings in the Accounting Codes pop-up.
- The Speedtype field cannot be left blank—enter a SpeedType value or N/A.

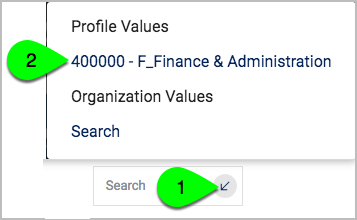
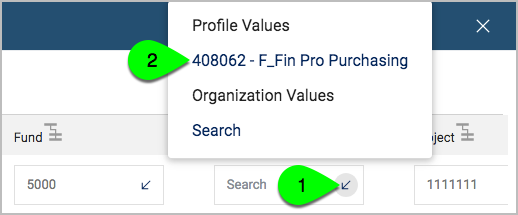
- To select a value from your profile, click the arrow within the box. Then, make a selection from the list that appears.
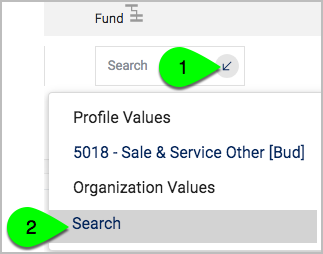
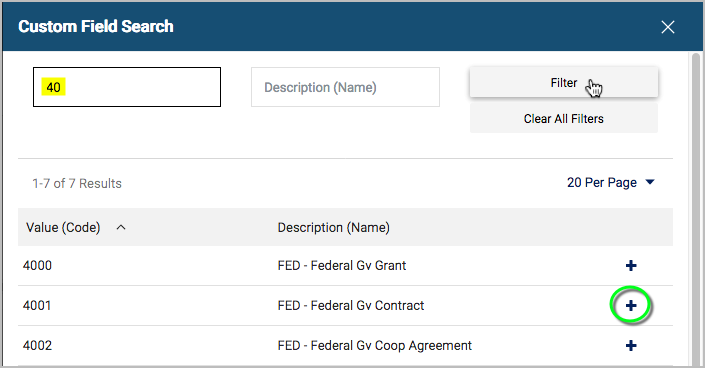
- To search for a value, click the arrow within the box. Then, click on the word Search. In the Custom Field Search pop-up, start typing the value (optional), and click the Filter button. Finally, click the plus sign to select a value.
- The Speedtype field cannot be left blank—enter a SpeedType value or N/A.
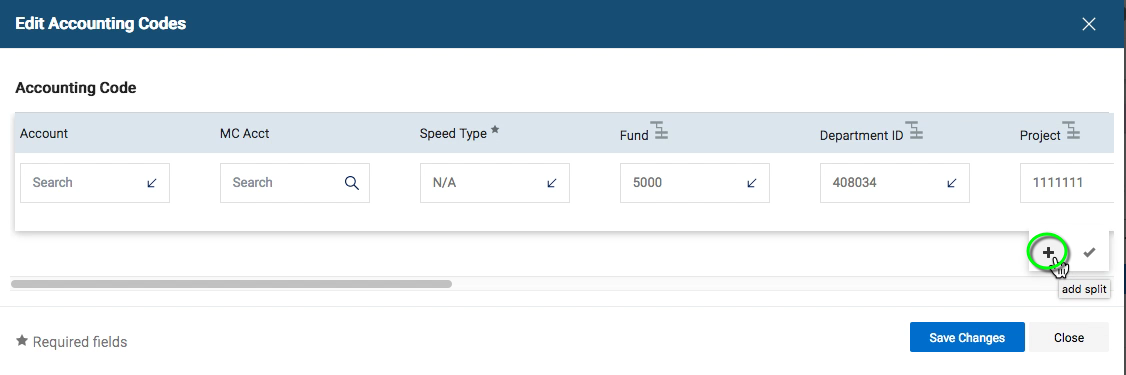
- (Optional) To add split funding, click the plus sign (as many times as needed). Enter your chartstrings. Then, scroll to the far right of the Edit Accounting Codes pop-up and select % of Price or Amount of Price from the dropdown. Enter the percentage or dollar amount for each code.
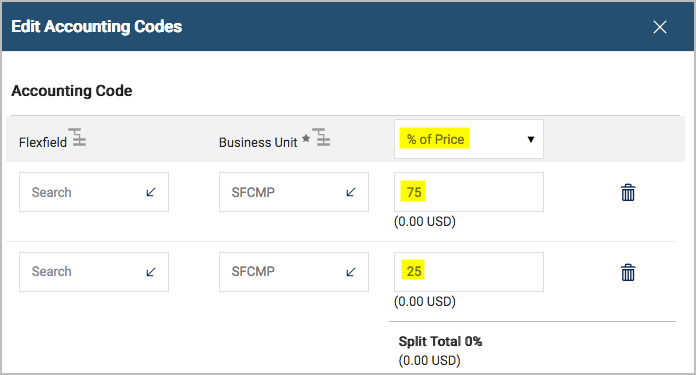
- When finished, click the Save Changes button.
Helpful Hints:
- To validate your chartstrings before submitting the order in BearBuy, use the SpeedType Search and Chartfield Validator accessible through MyAccess.
- To override the default Account Number associated with a catalog item or BearBuy form, simply enter a different Account Number in the Account field in the Accounting Codes. The value in the Accounting Codes will override catalog or form values.
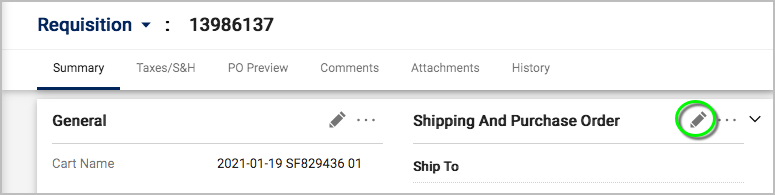
Checkout: Shipping Address
- When you are finished adding/editing items in the cart, click the Proceed to Checkout button.
- Under the Requisition Summary tab, click the pencil icon next to the Shipping And Purchase Order section.
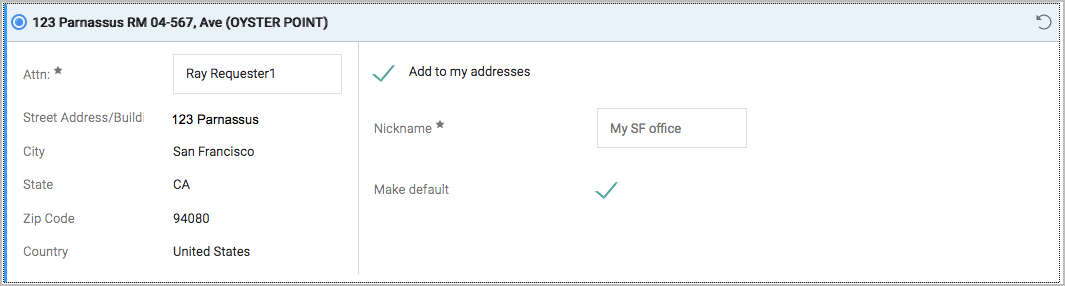
- In the pop-up window, select the radio button next to your desired address.

- If the address isn't listed in your profile, search for the address using the search box at the bottom of the pop-up window. Campus shipping addresses can usually be found by searching for the street/building number, street name, and room number. It can help to use asterisks/wildcards, such as *123* *Parnassus* *04-567*. Click on the address to select it. Then, select the Add to my addresses checkbox to save the address to your profile, and give the address a Nickname. Next, select the Make default checkbox to save the address as your default shipping address (if desired).

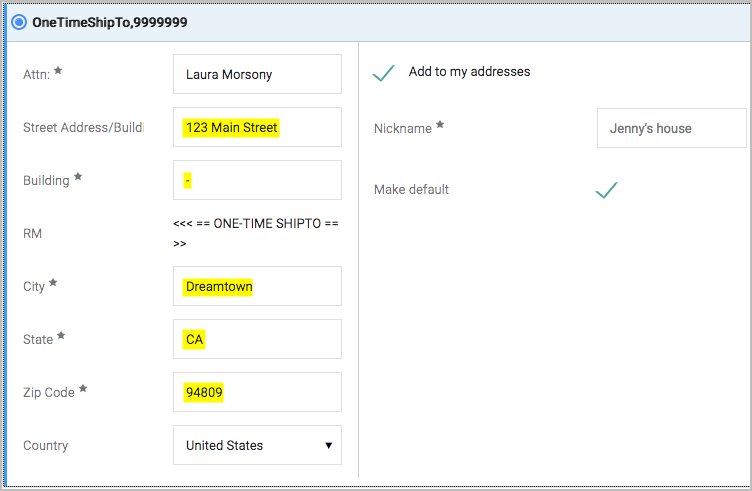
- If the address isn't listed in BearBuy, you may use a One-Time Shipping Address. Search for the term one-time in the search box at the bottom of the Edit Shipping and Purchase Order pop-up window. Click on the One-Time Address option. This will allow you to enter the address as free text. Next, select the Add to my addresses checkbox to save the address to your profile, and give the address a Nickname. Then, select the Make default checkbox to save the address as your default shipping address (if desired).

- Finally, click the Save Changes button.

Helpful Hints:
- Requesters located in the Parnassus campus area have the option to ship certain items to the UCSF Logistics facility at Oyster Point, rather than shipping directly to campus. For more information, go to UCSF Package Delivery Program.
- Radioactive Materials must be shipped to an EH&S Radiation Receiving Laboratory.
- For hazardous chemicals, follow the guidance from UCSF ChemCentral for your location.
- DEA Controlled Substances must be shipped to an EH&S central Controlled Substances Distribution Office .
- For live animals, visit the Laboratory Animal Resource Center (LARC) website for guidance.
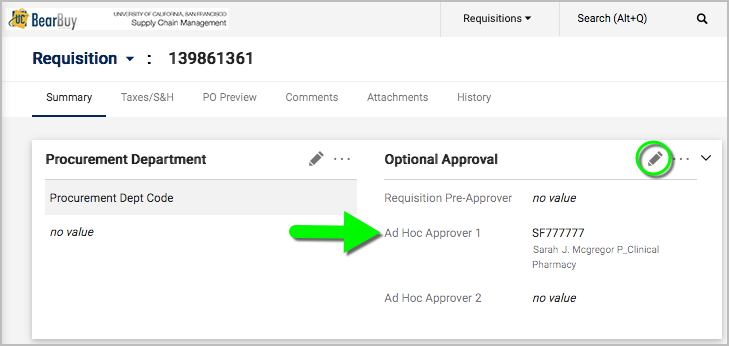
Checkout: Optional Approvers (Pre-Approver, Ad Hoc Approver)
Requesters may specify up to three departmental approvers on the requisition. These optional approvers will be added to the requisition workflow in addition to any required, system-generated approval steps. Departments typically reserve the use of Optional Approvers for split funding or specific types purchases.
- The Pre-Approver will be added to the workflow before any required departmental approvals.
- The Ad Hoc Approver(s) will be added to the workflow immediately after any required departmental approvals.
Note: The individual must already have the Requisition Approver role in BearBuy to be selected as an Optional Approver.
- To add an optional approver, click the pencil icon next to the Optional Approval section on the requisition.
- Start typing the approver's name in the search box that appears. Note: Names may include a middle initial.
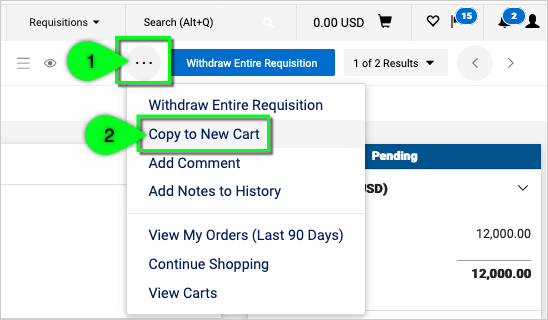
Withdraw a Requisition
After submitting an order, you may withdraw the requisition to cancel it (as long as it hasn't been fully approved, yet).
- Navigate to the requisition in BearBuy – click on your User Profile icon at the top of your screen and select My Pending Requisitions to view your pending orders. Then, click on the Requisition number to view the specific requisition.
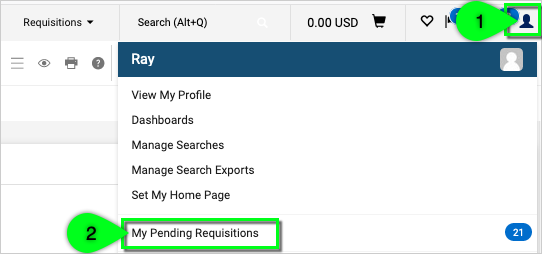
- When viewing the requisition, click the Withdraw Entire Requisition button at the top of your screen.

- To resubmit the order, click on the ellipses (...) located to the left of the Withdraw button. Then, select Copy to New Cart from the dropdown. The items will appear in a new shopping cart, which you can edit as needed before placing the order. Carefully double-check the Procurement Dept Code, Shipping Address, and Accounting Codes before placing the order.
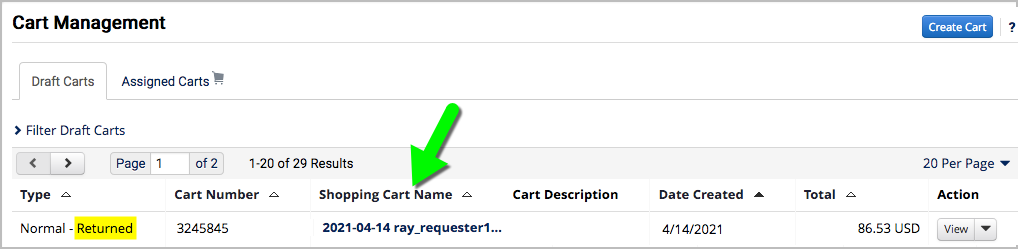
My Returned Requisitions
Requisitions may be returned to you by your department's Approver, your Department-Assigned Buyer, or the BearBuy system. You will receive an email notification from BearBuy when a requisition is returned to you.
- Click on your Action Items flag at the top of BearBuy. The returned requisition will be listed under Carts Assigned To Me (if the cart was started by a Shopper) or My Returned Requisitions (if you started the cart).
- Click on the Shopping Cart Name to view the order details.
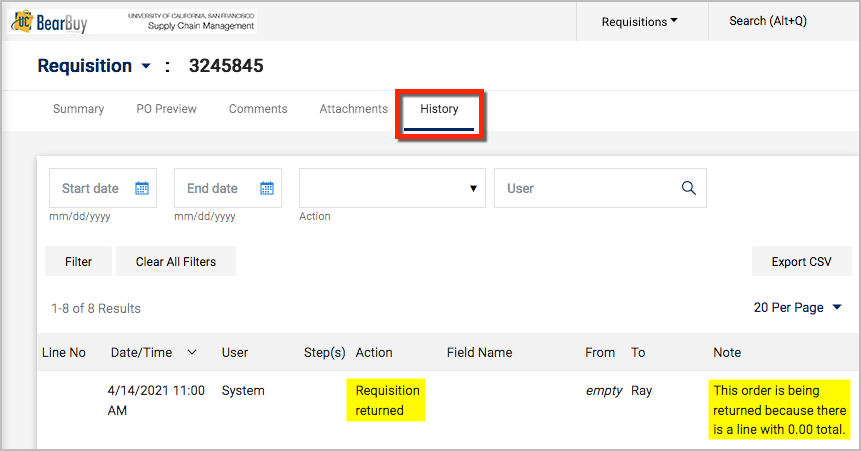
- On the requisition, click the History tab. Read the error message or comment. For requisitions returned to you by an Approver or Buyer, contact the person who returned the requisition if you have questions.
- Correct any relevant information, and click the Place Order button to resubmit the order.
Common Errors and Solutions:
| Type of Error | Workflow Error | Solution | Helpful Hints |
|---|---|---|---|
| Invalid chartstring | The requisition History will include a Note similar to: "Line 1 Split# 1 SFCMP-52203-50000 -408062-72 Combo error for fields Acct/Fund/Project/Dept ID/Func..." | Enter a valid chartstring. | To validate your chartstrings before submitting an order in BearBuy, use the SpeedType Search and Chartfield Validator accessible through MyAccess. |
| Duplicate chartstring | The requisition History will include a Note similar to: "Line 1 Split# 1 SFCMP-52203-50000- 408062-72-1111111 has duplicate chartstring distributions." | Modify the Accounting Codes on the requisition by combining or removing multiple chartstring distributions containing the exact same combination of values. | |
| Zero Cost line item ($0.00) | Zero Cost Line Item Return | Place the order using the Non-catalog form, and enter the price as $0.01. Alternatively, describe the item in the External Notes on the requisition, rather than entering it as a line item. | This error can occur when a supplier gives you a quote through a BearBuy punch-out that includes a free item. Ask the supplier to remove the item from the quote or place your order using the Non-catalog form. |
| Supplier not open for ordering | Not Open for Ordering Return | Submit a Payment Request if your transaction falls into one of the allowable "Activity Types" on the form. Otherwise, contact the supplier and ask if they will agree to accept a purchase order (PO) and update the supplier's profile as needed. | Foreign supplier's profiles may be opened for ordering by emailing [email protected] for assistance. In your email, please include an email address for the supplier where we can send orders. For domestic suppliers, ask the supplier to complete the UCSF Substitute W-9 & Supplier Information form, including Section 2 of the form with an email address or fax number where we can send orders. Email the completed form to [email protected]. |
| Invalid shipping address for Radioactive Materials | Radioactive Auto-Return | Replace the shipping address with an approved EH&S Radiation Receiving Laboratory. | Consult your Department Safety Advisor at the Office of Environmental Health and Safety if you have any questions. |
| Mixed items with Payment Request or Change Order | Mixed Order Auto-Return | Move the item(s) to another cart and resubmit the order. | When submitting a Payment Request or Change Order, do not mix other forms or catalog items in the same cart. After filling out the form, select Add to new Cart from the Available Actions on the form to ensure the form is added to a new, empty shopping cart. |
Communicate Using BearBuy Comments
Requesters can use the Comment feature in BearBuy to communicate with other users, such as when your department's Approver asks you a question about an order you submitted.
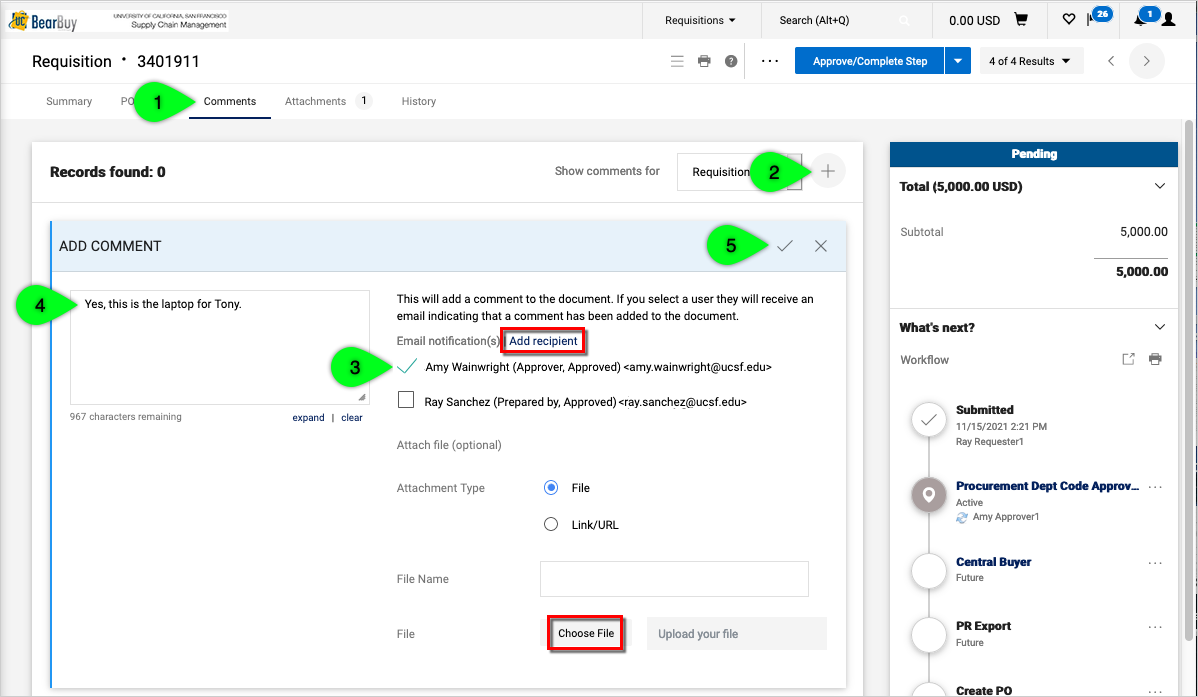
- On the requisition, click on the Comments tab at the top.
- Click the Plus sign on the right.
- Select a recipient for your comment (if desired). Note: The "Prepared for" is the Shopper who originally started the shopping cart. An Approver may also be identified. To select a different recipient, use the Add recipient link.
- Enter your comments in the text box. To upload an attachment, use the Choose File link.
- When finished, click the Checkmark.
View All of My Recently Submitted Requisitions
To quickly find a requisition, enter the requisition number in the search bar at the very top of BearBuy, and select Requisitions from the dropdown. Finally, click the magnifying glass.

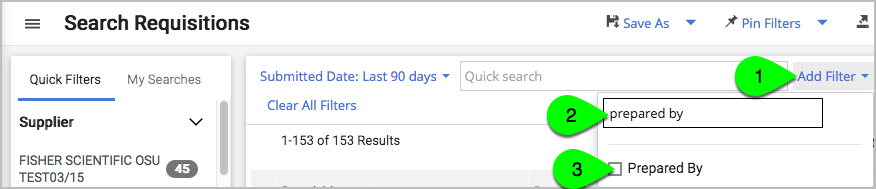
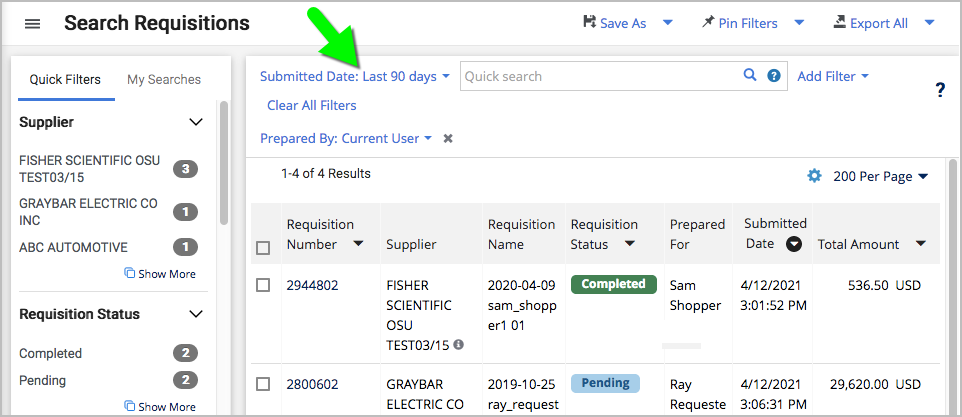
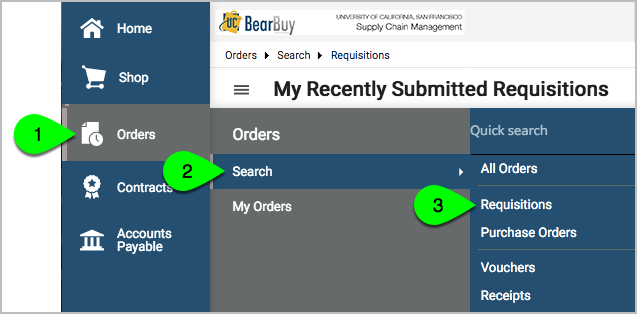
Alternatively, use Document Search to search for all requisitions you submitted.
- From the side navigation bar, go to Orders > Search > Requisitions.

- Click the Add Filter link. Then, start typing Prepared by and select the filter.
- Select the checkbox for Current User, and click the Apply button.
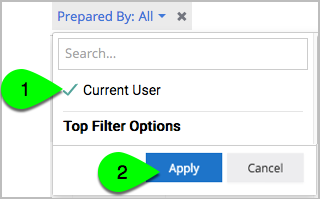
- The search will default to requisitions you submitted in the Last 90 Days. Adjust the filters as needed.
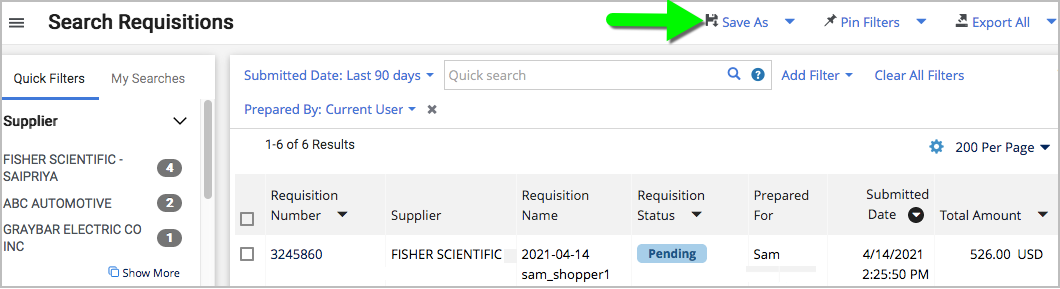
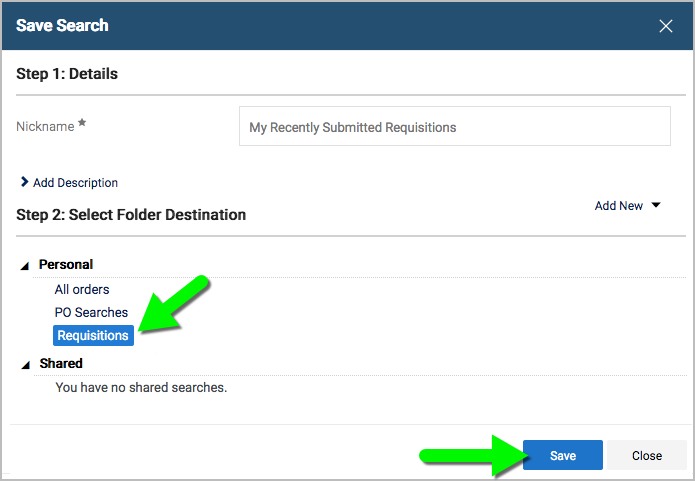
- (Optional) Save your search for quicker access in the future.
- Click the Save As link at the top.
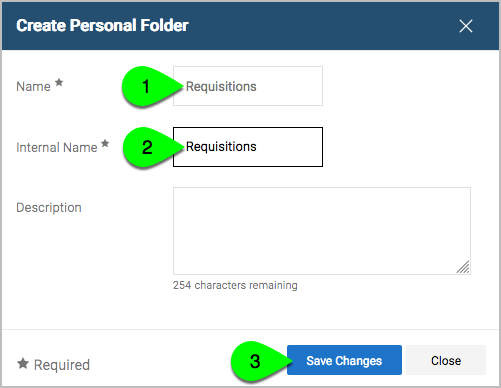
- In the Save Search pop-up, give the search a Nickname. Select a folder where you would like to save the search, or click the Add New link (then select Top level personal folder, give the new folder a Name and Internal Name, and click the Save Changes button).
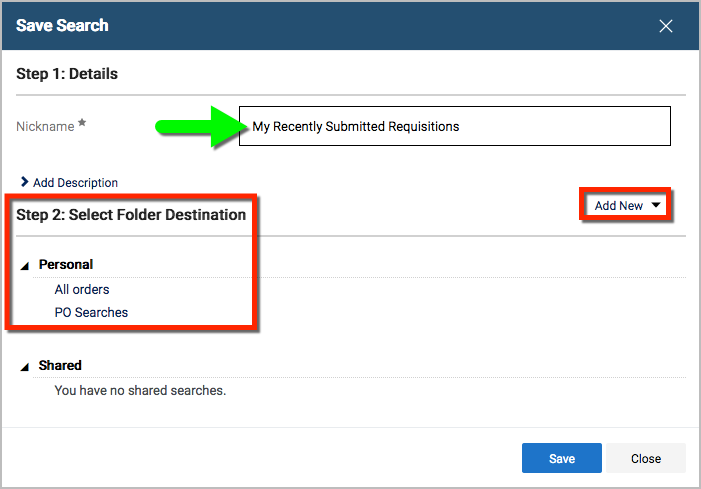
- The folder is now selected, and you may click the Save button.
- In the future, return to your search by navigating to Orders > Search > Requisitions. Then, select the My Searches tab on the left, and select the search you created.

- Click the Save As link at the top.
Set a Substitute
This training demonstrates how to set a substitute for your Assigned Carts. When someone assigns a cart to you, the cart will be automatically redirected to your substitute.
Note: The person who you set as your substitute must already have the Requester role in order to submit requisitions.
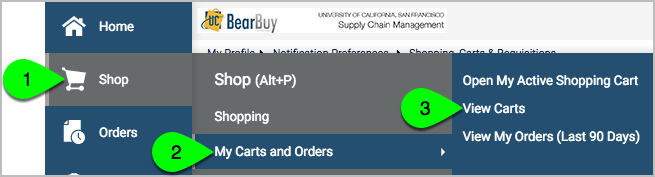
- Navigate to Shop > My Carts and Orders > View Carts.
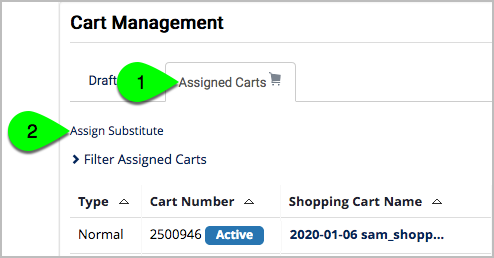
- Click on the Assigned Carts tab at the top.
- Click the Assign Substitute link.
- Search for your desired substitute, and then click the select link next to their name.
- To end the substitution, go to Shop > My Carts and Orders > View Carts > select the Assigned Carts tab at the top > click the End Substitution link.
What happens next?
After placing the order in BearBuy, the requisition will route for approval. The approvals workflow is viewable in the right side of the requisition. You may need to click the Show/Hide Sidebar icon to view the approval workflow.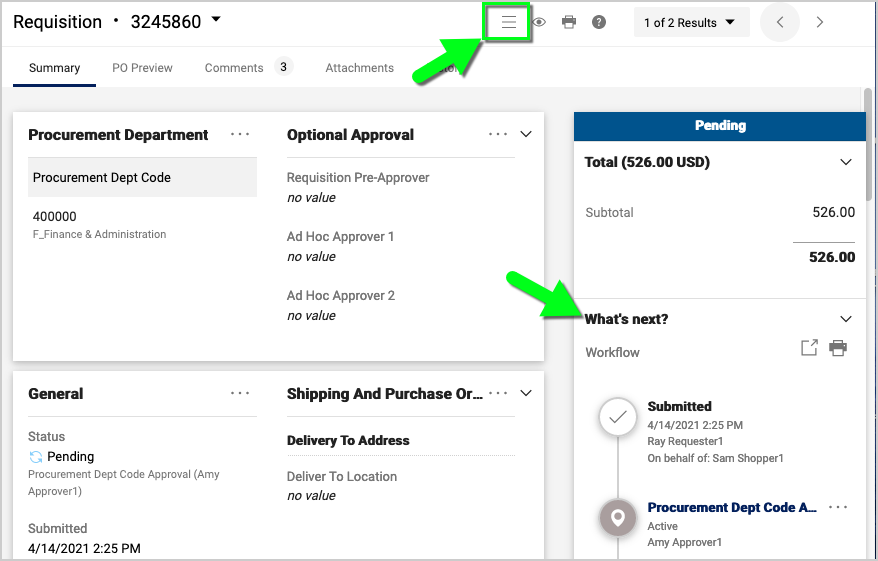
At this stage, you can still withdraw the requisition to cancel it (as long as it hasn't been fully approved).
The requisition may be returned to you by your department's Approver or Department-Assigned Buyer to make edits and resubmit. Requisitions may also be returned to you by the BearBuy system if the Accounting Codes are invalid or other errors are detected. You will receive an email notification if the requisition is returned.
Once the order is fully approved, the purchase order (PO) will be generated.
- The purchase order (PO) will be sent to the supplier immediately.
- Typically, suppliers will email an order confirmation to the Shopper or Requester (whoever originally started the shopping cart). For order status inquiries, please contact the supplier directly; order status/tracking is not available in BearBuy.
- To cancel the order, contact the supplier directly. Then, you may submit a Change Order in BearBuy to close the PO.
- To modify the order, read more about Change Orders.
- Packages delivered to campus by UCSF Logistics are searchable in the UCSF Logistics Utility. For more information, go to UCSF Package Delivery Program.
- Not all packages are shipped via UCSF Logistics. Contact the supplier or shipping company for tracking details.
- For a Payment Request or After The Fact PO, the PO Number is generated for internal reference only; the PO will not be sent to the supplier. A voucher (invoice) will be generated in BearBuy and undergo approvals before the invoice is paid. For more details, go to Payment Status.